Updated on February 19, 2024
1. Self vs Managed Hosting
I want a WordPress blog that makes money online.
So I definitely need web hosting.
But with so many web hosting providers to choose from, I was at a loss until an idea struck.
Why not host it myself?
Self hosting means that I am responsible for managing my servers, while managed hosting means web hosting providers do it for me for a fee.
So self hosting is cheaper but I need to have the technical skills to do everything myself.
Luckily, I know how to host my blog in the cloud with Amazon Web Services (AWS).
Then I got really curious.
Are you really getting a bang for your buck by having someone else manage your hosting for you?
Let’s compare my self hosting design against some managed hosting services.
2. Design Requirements
Based on the AWS Well-Architected Framework, my blog must be:
- Fast – Page load time of 2s or less.
- Secure – Most people don’t know how to keep their websites safe. I have no excuse.
- Highly available – At least 95% uptime or it’s bad enough for AWS to waive my bill.
- (BONUS) Cheaper than managed cloud hosting – Otherwise, why self host?
Moving forward, I will use requirements 1, 2, and 3 to evaluate any hosting, self or managed.
3. Hosting Architecture
I started with a purely cloud native design but it would have cost $70/mo 😱.
So I replaced some cloud resources with open source software. To keep my bill even lower, I ran these software as Docker containers.
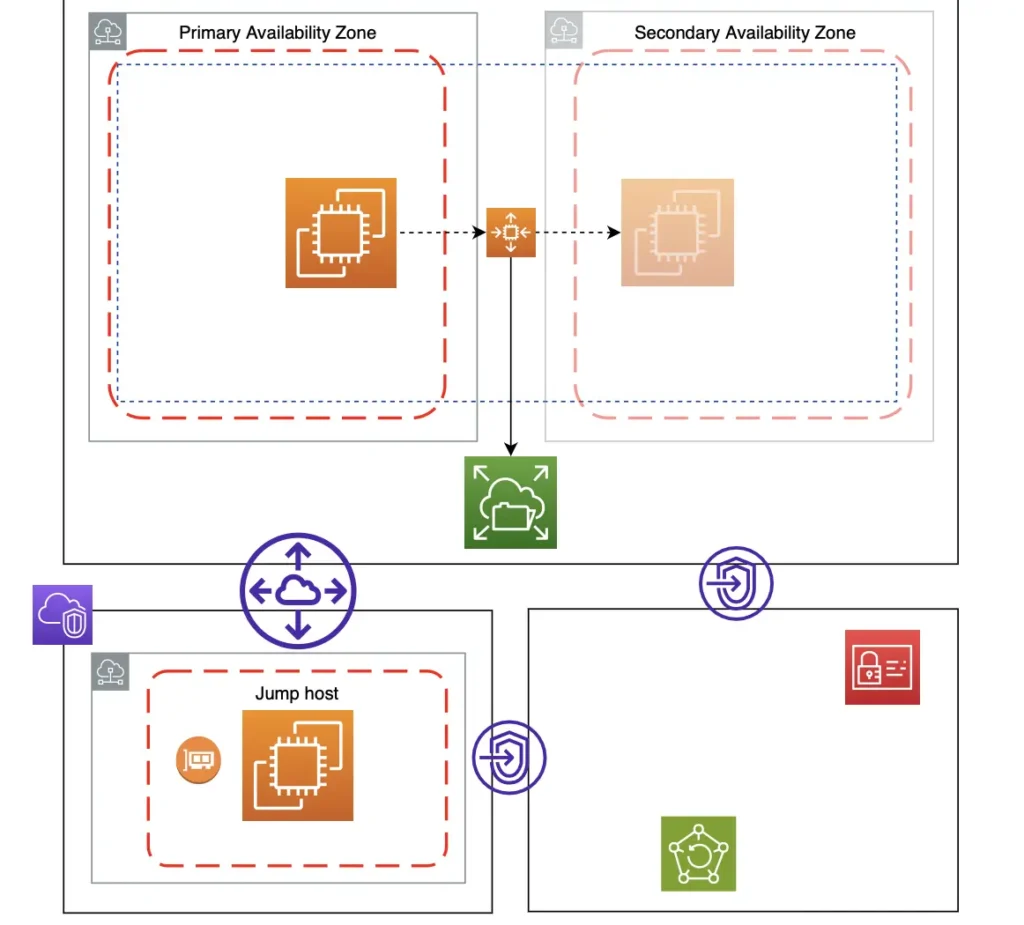
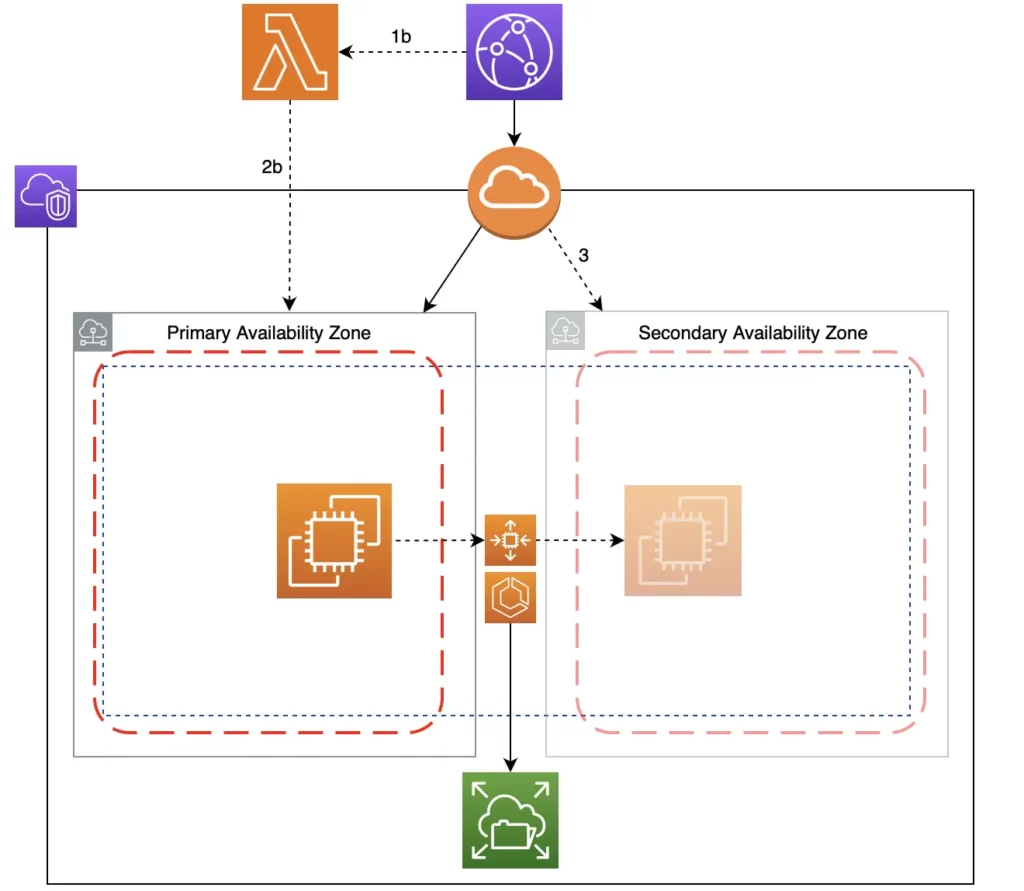
After 5 designs, 4 POCs, and countless hours of testing and optimization, I came up with this architecture, a hybrid of cloud resources and Docker containers:
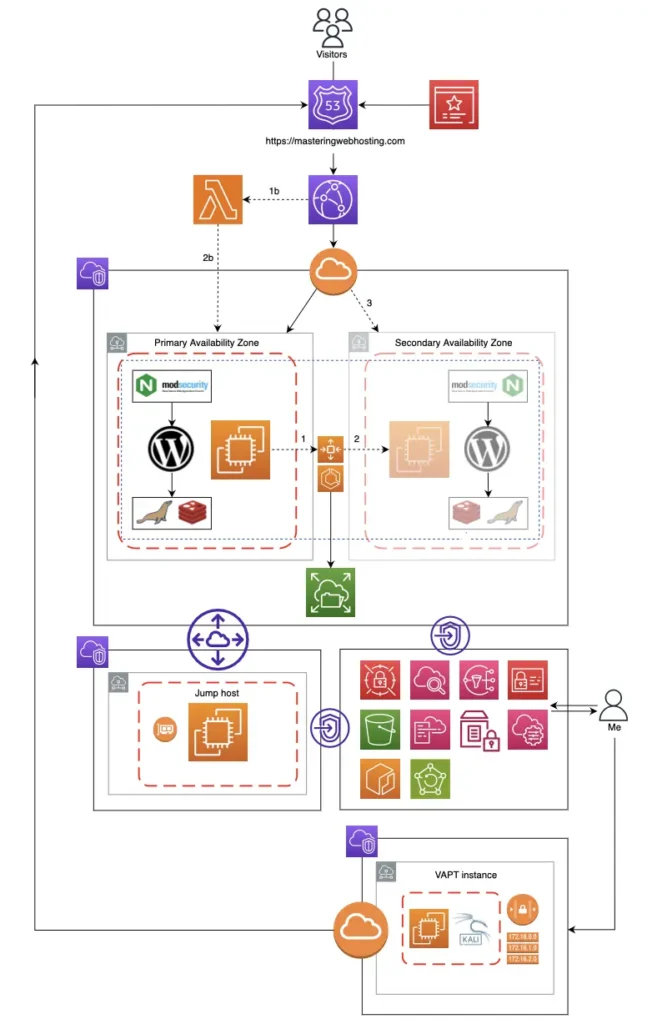
4. My Cloud Resources
Networking
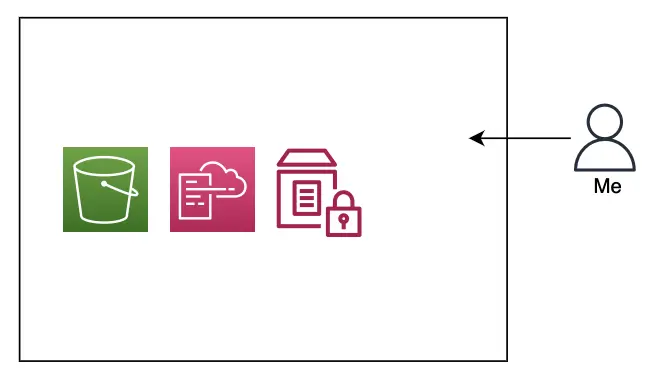
I provisioned 2 Virtual Private Cloud (VPCs) to isolate my resources from other networks: One to host my blog and another to manage my site files remotely and securely via VPC peering.
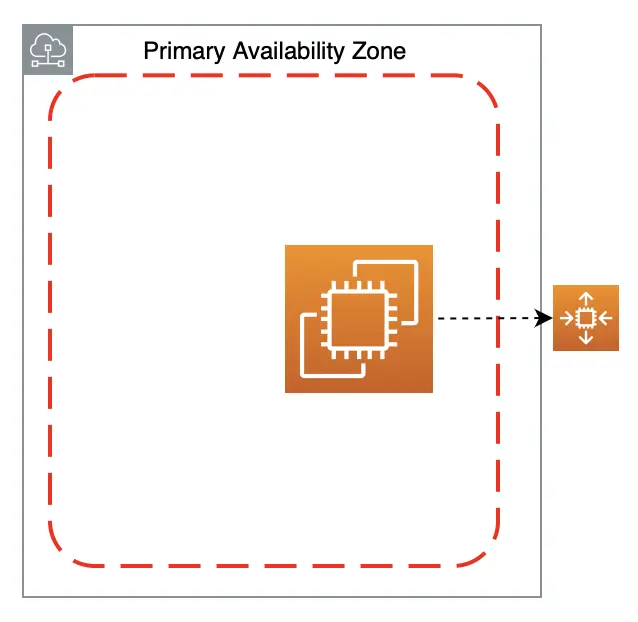
Web Server
My blog is hosted on an Amazon Linux EC2 instance with these properties:
- It is a reserved instance so it is cheaper for long term use.
- It is highly available as it is in an Auto Scaling group (ASG) which:
- Ensures there’s always 1 EC2 with my configurations running or it will launch one.
- Emails me via Simple Notification Service (SNS) if an EC2 is terminated or launched.
- It is fault tolerant. I have a failover strategy in case its Availability Zone (AZ) is down.
- It is secure. EC2s running 24/7 are susceptible to port scanning. To keep mine safe, I only opened the ports I needed and restricted access to them with security groups.
Jump Host
I use another Amazon Linux EC2 with VPC endpoints as a Jump host to manage my storage resources.
I only granted it the IAM permissions it needs (The Principle of Least Privilege) and removed all Internet gateways in its VPC so traffic doesn’t go over the Internet.
To save some money, I only spin up my Jump host when I need it.
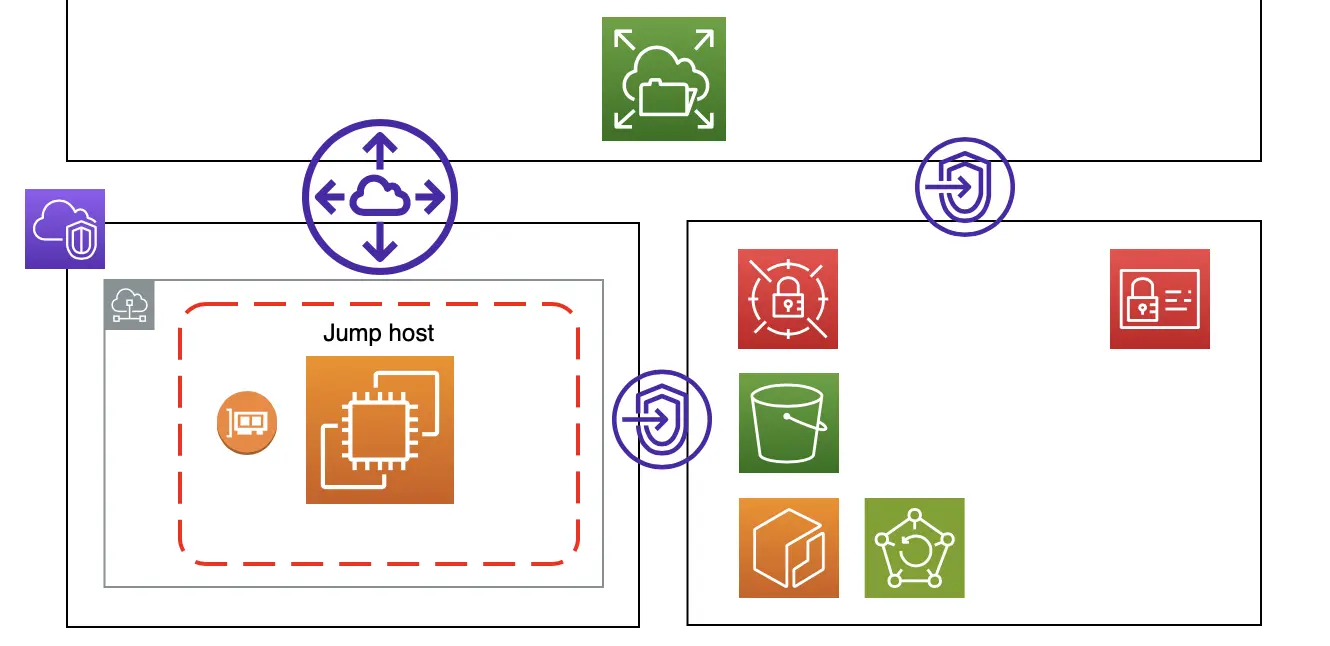
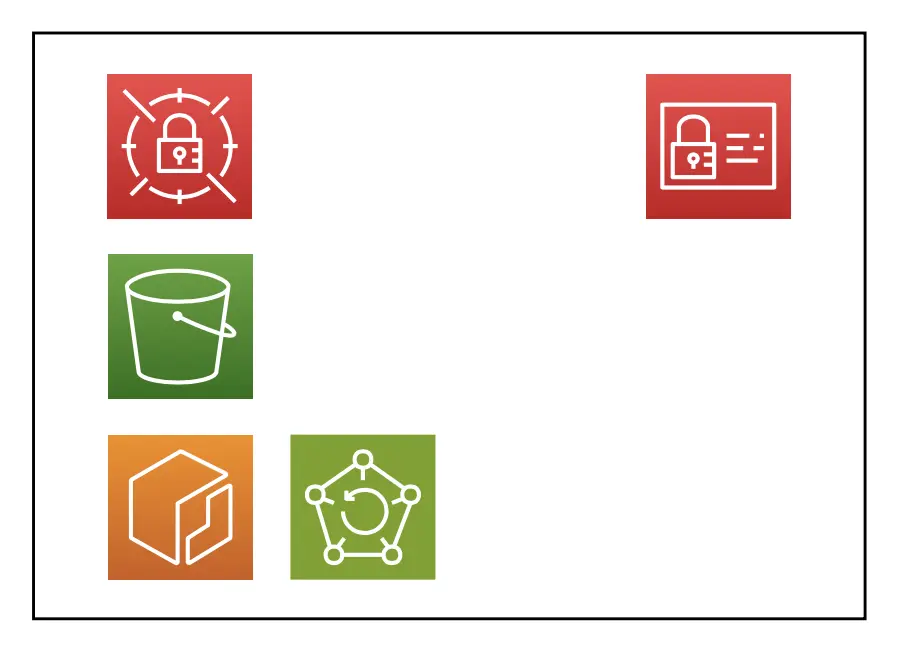
Storage Resources
Elastic File System (EFS) – A file system interface that scales automatically for my EC2 to store its data files across many AZs. This way, my data remains available even if 1 AZ has an outage. I protect my data by:
- Creating security groups and IAM policies to allow access from my EC2 and Jump host.
- Encrypting my EFS data at rest and in transit.
- Backing up my EFS data in well…AWS Backup.
S3 – Where I store my CloudFormation scripts and configuration files.
Elastic Container Registry (ECR) – A fully managed container registry for my Docker images. Like EFS, ECR supports IAM access control; Only my Jump host can build and push images to ECR.
Secrets Manager – A managed service where I store my Secrets securely in 2 ways:
- With encryption at rest and in transit.
- With IAM policies – Only the necessary AWS resources can access my Secrets.
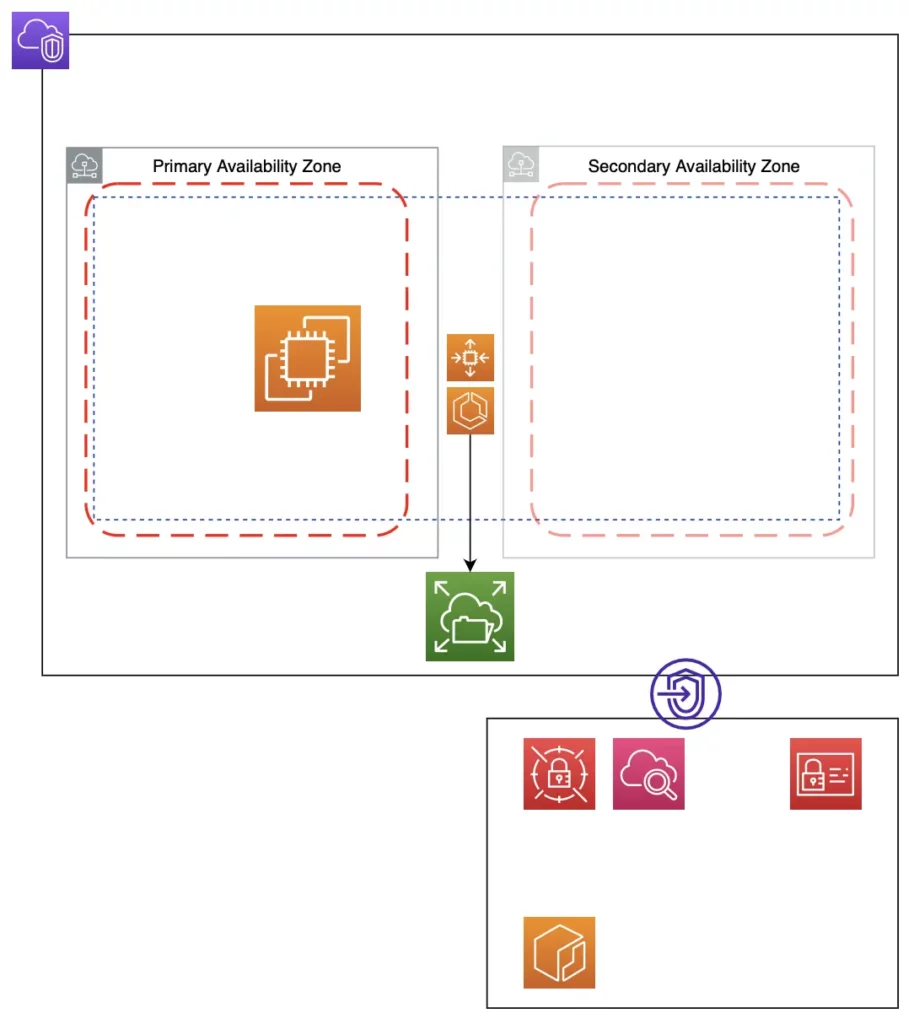
Docker Container Deployment
I said earlier that I am running open source software as Docker containers to replace some cloud resources and to lower my bill because they are lightweight and use less computing power.
The best way to run Docker containers in the cloud is with:
- A self-healing orchestration tool like Kubernetes.
- A platform with integrated persistent storage, logging, and security.
Enter Elastic Container Service (ECS), a managed container orchestration service that deploys my Docker containers in a cluster.
The cluster ensures my containers are always running or it will spin new ones up automatically, making them highly available.
ECS is also well integrated with other AWS services and is easier to use than Kubernetes:
- My cluster runs on my EC2 in an ASG – More high availability for my containers.
- My data files are persisted in EFS – In the event my containers are stopped, the new containers launched by ECS can continue seamlessly from where the former left off.
- My Docker Secrets are stored in Secrets Manager – Only accessible to my containers.
- My Docker images are stored in ECR.
- My container logs are stored in CloudWatch for my analysis.
- Running the cluster on a reserved EC2 is cheaper than using Fargate.
Resource Monitoring
I monitor my EC2 with CloudWatch and set up SNS to email me if there are any issues.
CDN
To speed up my blog’s page load times, I used CloudFront to cache and serve my blog to readers around the world through its 450+ Points of Presence.
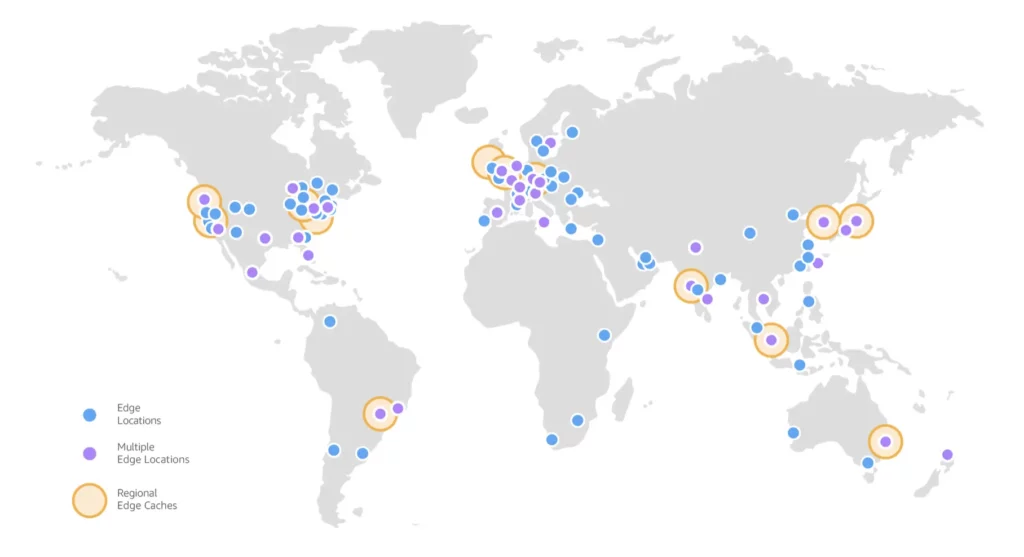
Source: AWS
My EC2 is the origin for my CloudFront distribution.
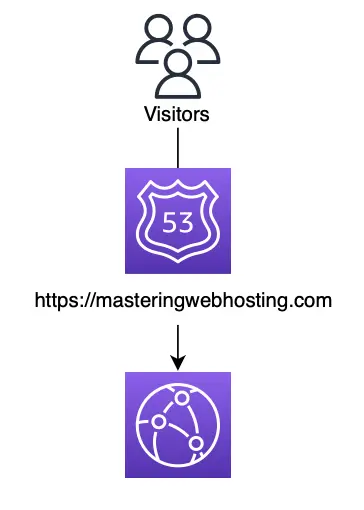
DNS
I bought my domain name on Route 53 and mapped it to my CloudFront distribution.
This lets visitors reach my blog using my domain name.
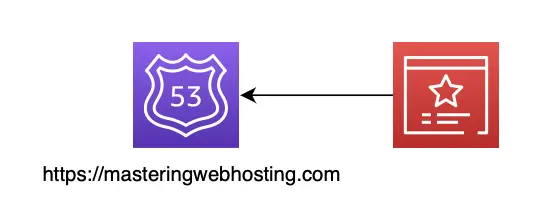
TLS/SSL
For more security, I got a TLS certificate for my domain from Certificate Manager and set up HTTPS on my CloudFront distribution. This encrypts the traffic between my blog and readers, providing a secure browsing experience.
Resource Deployment
All my resources were deployed via the CloudFormation scripts in my S3 bucket.
I store my environment variables in System Manager Parameter Store, so no one else can see them if I ever feel like sharing my scripts in GitHub publicly.
This means I can recreate my entire hosting infrastructure in minutes if needed.
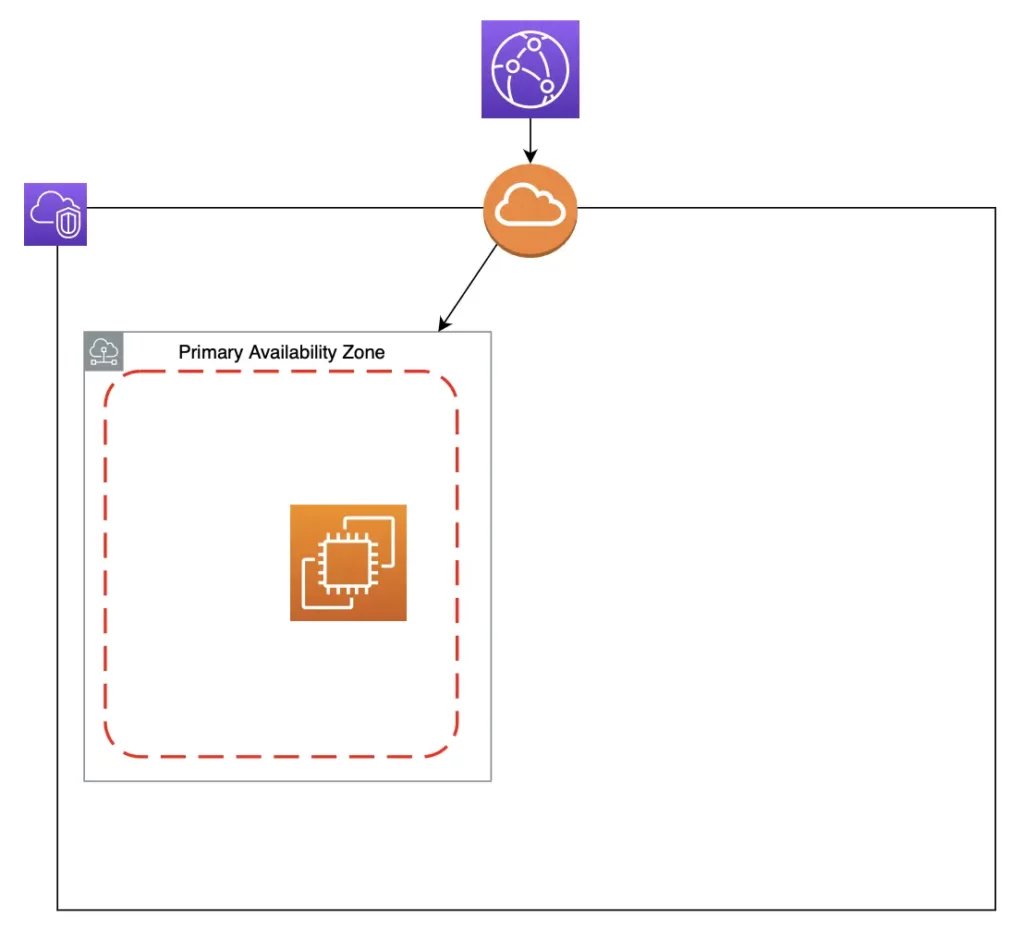
Failover Strategy
The usual way to achieve high availability is to run your website across more than 1 AZ.
This means you have at least 2 sets of the same resources running concurrently.
We call this redundancy. Or in layman’s terms, a backup plan.
There are pros and cons:
Pro: If there is an outage in 1 AZ, your website will still be up and running in the other AZ. So there won’t be any disruption to your visitors’ experience.
Con: It doubles your hosting cost. Which is unjustifiable to some businesses because the spare resources probably wouldn’t be used most of the time.
I want the best of both worlds: High availability and a low hosting cost.
So, I chose a middle ground.
A failover strategy where:
- My blog runs and receives web traffic in a primary AZ.
- A secondary AZ is always on stand-by to take over if the primary goes down.
If my primary AZ is down:
- My EC2 triggers my ASG to mark it as unhealthy.
- My ASG replaces the unhealthy EC2 with a new one in my secondary AZ, which mounts itself to EFS. ECS then runs new Docker containers on it with the latest EFS data.
- The new EC2 updates CloudFront to point to it as the new Origin.
All these happen automatically within 4min.

The plan above can handle most AZ outages.
But what if CloudFront cannot retrieve web content from my EC2 due to network issues with the primary AZ? This case, my ASG still sees my EC2 as healthy and won’t replace it in another AZ.
My failover plan will fail lol and my blog will still be down.
So time for a failover plan B.
This time, CloudFront will be the trigger:
- CloudFront caches a 504 error for 4 minutes if it cannot retrieve my web content. This is the time my failover takes to complete. If the failover fails and the error is cached again, CloudFront triggers a Lambda@Edge to mark my EC2 as unhealthy.
- My ASG replaces the unhealthy EC2 with a new one in my secondary AZ, which mounts itself to EFS. ECS then runs new Docker containers on it with the latest EFS data.
- The new EC2 updates CloudFront to point to it as the new Origin.
5. My Docker Containers
Reverse Proxy + Load Balancer
I love reverse proxies and load balancers but $22/mo for an Application Load Balancer? 🤨
I need another solution.
Nginx is an open source, multipurpose web server known for its high performance, scalability, and reliability.

I set up Nginx to:
- Serve as my reverse proxy + load balancer to direct and distribute my web traffic.
- Redirect traffic to certain pages.
- Enforce my Security Headers and Content Security Policies.
- Route visitors to the same container with sticky sessions for a seamless user experience.
- Cache my web content with PHP-FPM for faster page load times.
- Whitelist my IP addresses to access restricted pages and deny all others.
- Block public access to my blog until it is ready for release.
- Work in conjunction with my WAF.
WAF
For more security, I want a Web Application Firewall (WAF and a level 7 firewall) alongside my security groups (level 4 firewalls).
Most hosting providers offer this for free, but since I am self hosting and the AWS WAF starts at $5/mo, I figured I should create my own.
ModSecurity is an open source WAF that analyzes my traffic and blocks malicious requests.
While it is free, I had to set it up and configure rules that block/allow traffic.
Here are some highlights of my WAF:
- Usage of the OWASP ModSecurity Core Rule Set.
- Integration with Project Honey Pot.
- Denial of Service (DOS) protection.
When used together, Nginx can be configured to pass incoming traffic to ModSecurity for analysis before allowing it to reach my blog.
My Nginx + ModSecurity container thus serves as the front door for my containers. The WAF scans my web traffic, blocks malicious requests, and only allows legit visitors to reach other containers.
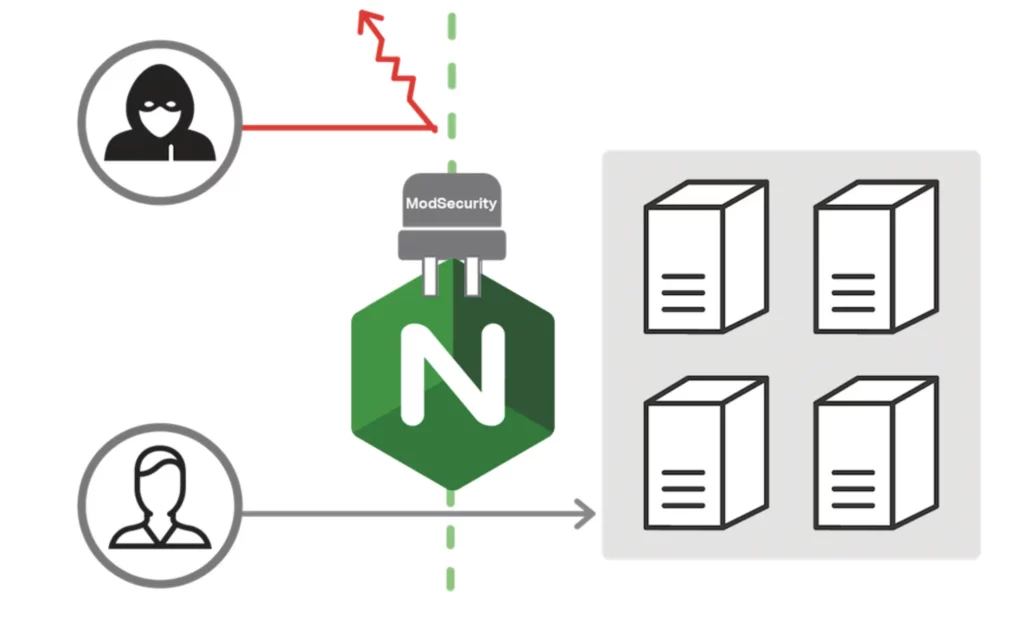
Source: Nginx
This gives my blog an extra layer of protection against web-based attacks like the OWASP Top 10 (eg. SQL injection and XSS attacks).
CMS
I use WordPress as my Content Management System (CMS) because it is user friendly.

Database
I use MariaDB because replicating a secondary database is easy if I want a multi-AZ set up in the future.
Cache
Redis is an open-source, super fast in-memory caching system that improves the speed of my blog.
How it works: My WordPress blog loads by retrieving content (eg. posts) from MariaDB.
An increase in traffic strains my database, causing slower retrieval and page load times.
Redis solves this by caching frequently accessed data in memory. This lowers the number of requests to my database.
It also retrieves data faster than MariaDB, so my blog loads faster and my visitors get better experience.
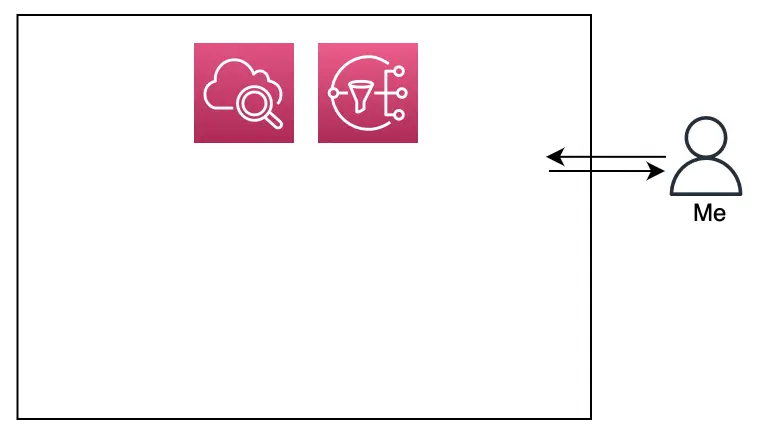
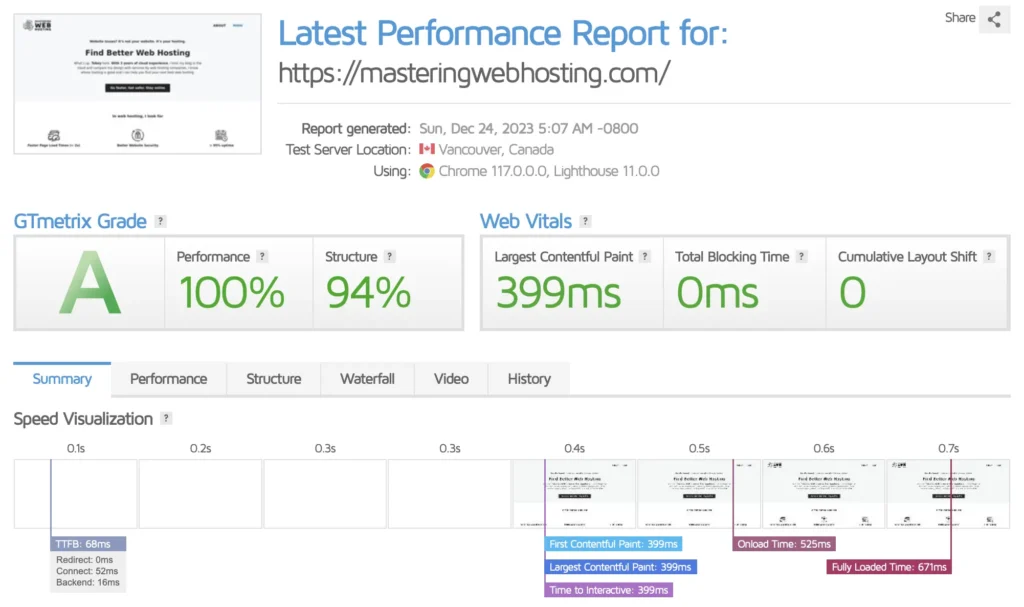
6. Speed Test
Let’s see how fast I can get with CloudFront, PHP-FPM, and Redis.
According to GTMetrix, my page load time (Fully Loaded Time) is 671ms, well below my limit of 2s.
And it’s not just one server from Vancouver saying this.
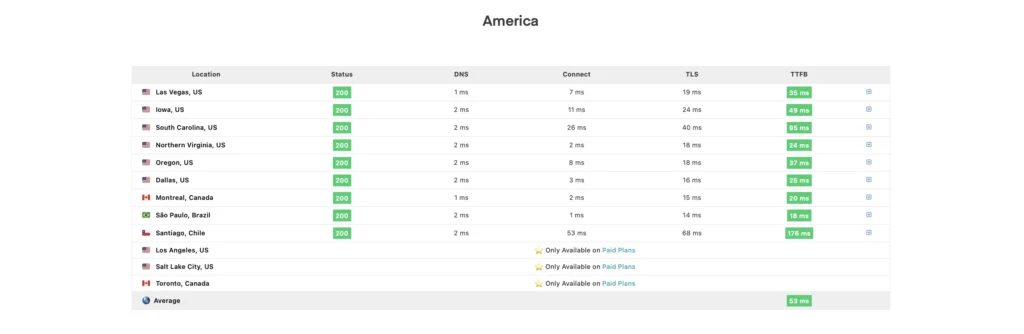
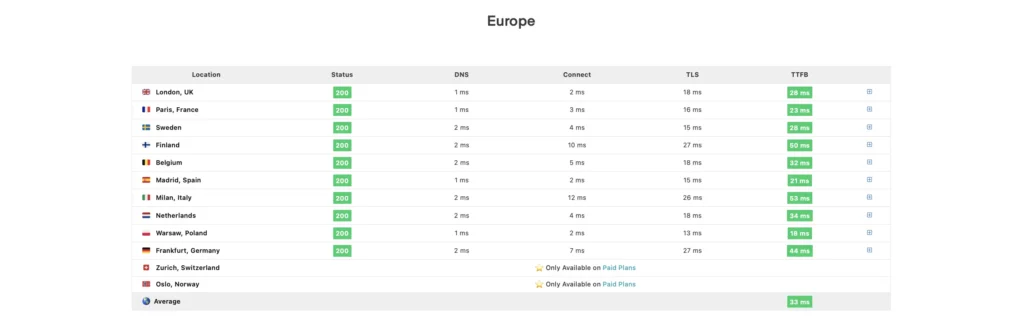
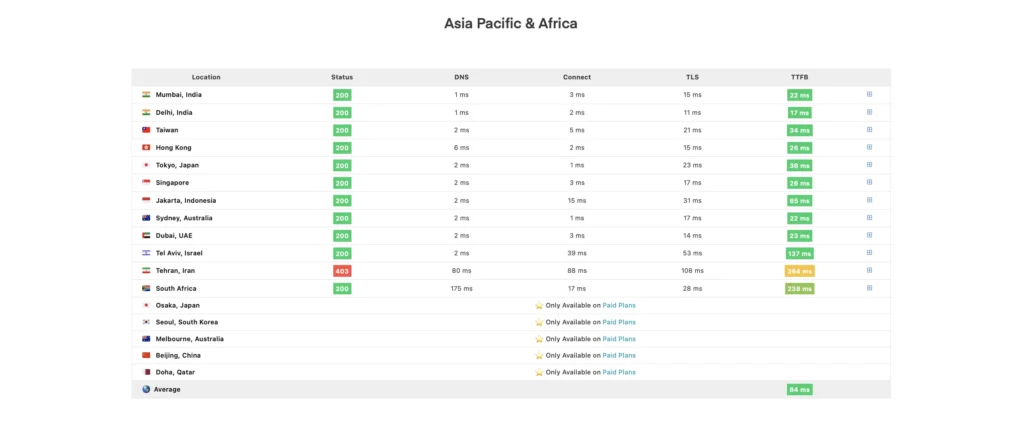
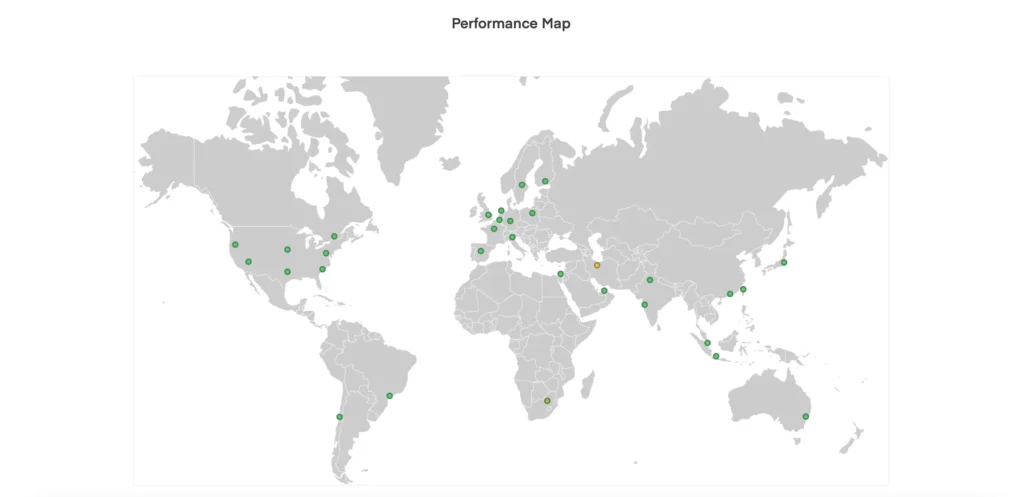
KeyCDN showed my blog is fast in other parts of the world too.
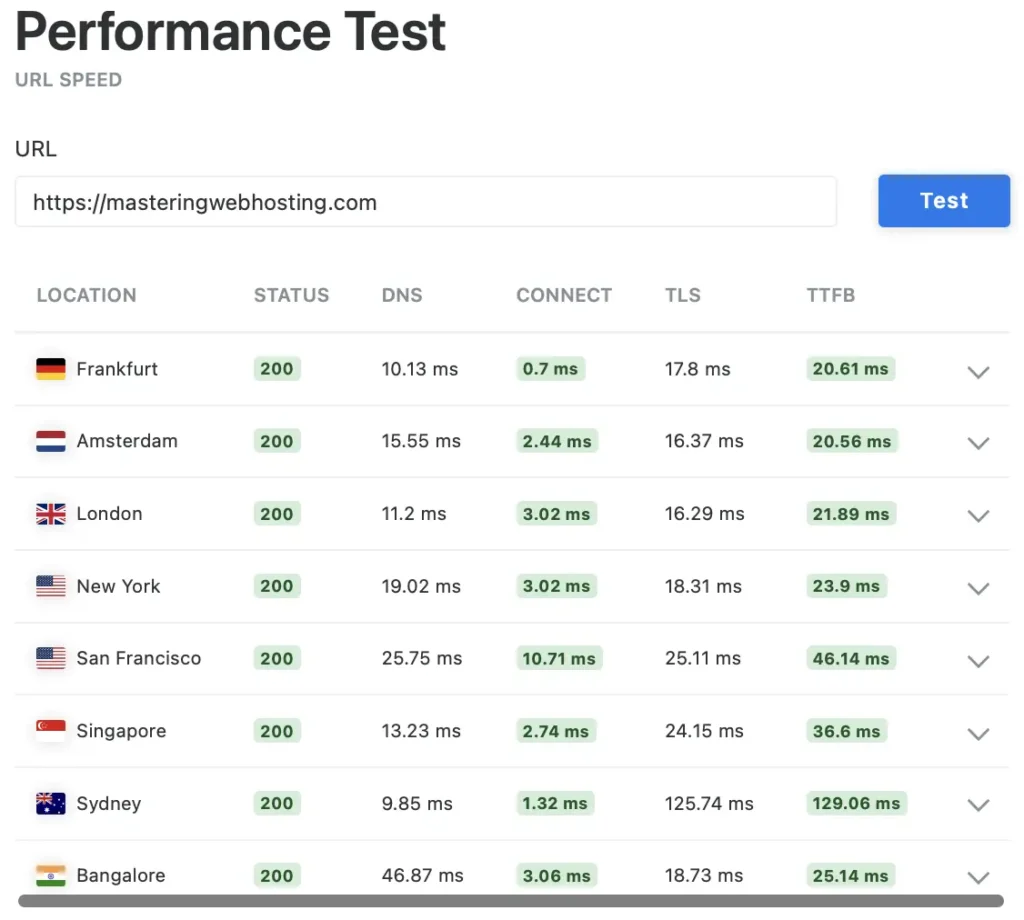
SpeedVitals supports KeyCDN and even gave my blog an A grade.

Not bad for a self hosting solution 😎👍.
7. Security Test
I wanted to see how good my ModSecurity WAF is.
So I set up a Vulnerability Assessment and Penetration Testing (VAPT) instance on a Kali Linux EC2 and installed OWASP-ZAP.
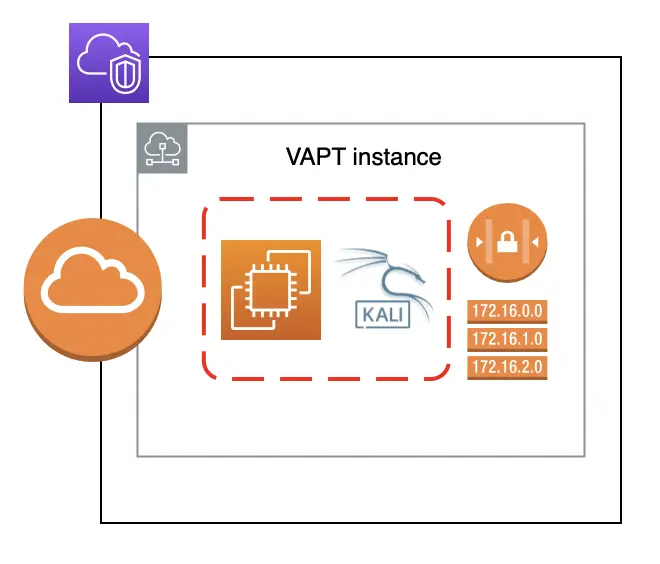

I then spammed my blog with cyberattacks.
Here’s the results:
- 2 out of 30 high risk vulnerabilities detected:
- Path Traversal – 1 out of 644 attacks successful. Okay as ZAP’s Confidence level in this attack is Low, so it might be a false positive.
- SQL Injection – SQLite – 2 out of 369 attacks successful. Okay as my blog doesn’t use SQLite.
- 0 out of 12 medium risk vulnerabilities.
- 2 out of 2 informational alerts. These aren’t vulnerabilities.

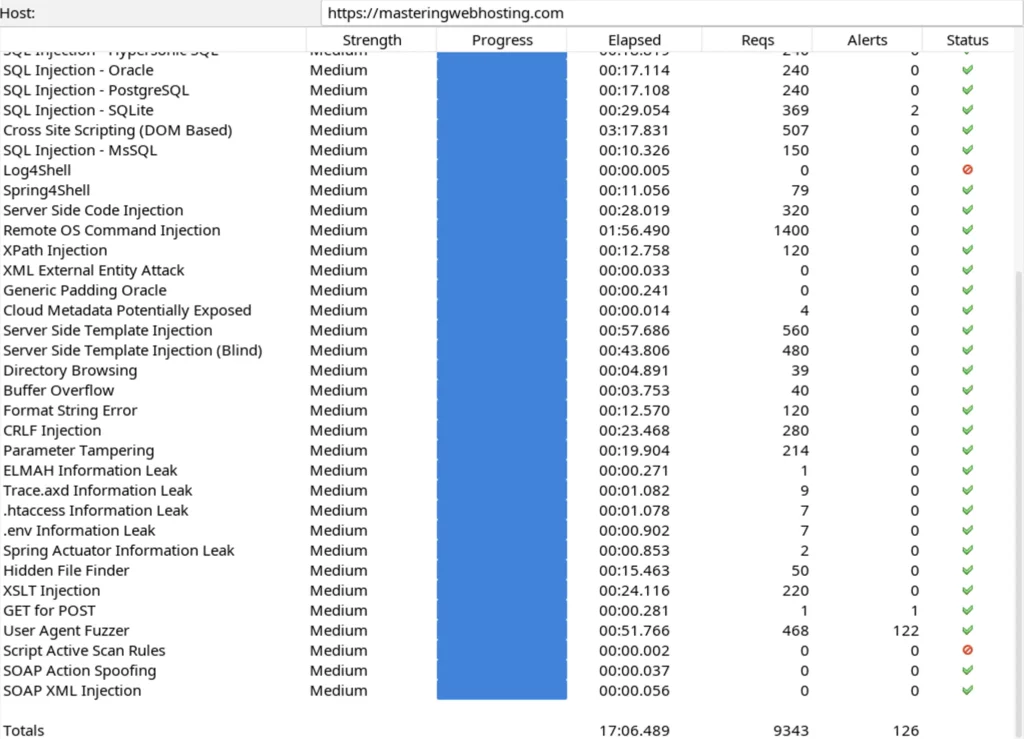
It seems my WAF protects my blog from most vulnerabilities (at least 40 out of 42).
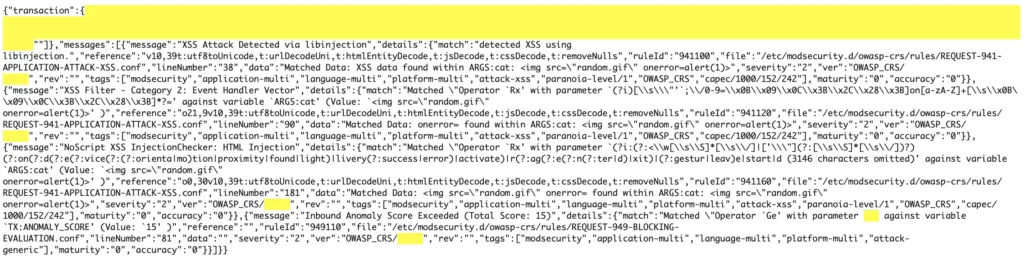
To be sure, I checked my Nginx + ModSecurity logs in CloudWatch.
They showed that my ModSecurity WAF has blocked most of my attacks successfully.
Honestly, this is a sweet victory after some bitter work.
My first few rounds of VAPT revealed vulnerabilities I didn’t expect/consider in my WAF; I had to fix them before running ZAP again. So each successive scan yielded better results than the last. This lasted several weeks before I achieved results on par with commercial WAFs.
Fun fact: I had to terminate my first round of VAPT because I forgot I set up rate limiting rules to stop DOS threats. My WAF blocked my VAPT instance within the first few attacks and I couldn’t continue testing. So I had to disable the DOS protection rules and run VAPT again.
At least I know my blog is strong against DOS threats lol.
I also expect my blog to do well against Distributed Denial of Service (DDOS) attacks because CloudFront comes with AWS Shield by default. I haven’t tested this though.
8. High Availability Test (2023)
Here’s the number of times a failover activity happened in 2023:
- My ASG triggered SNS 0 times.
- CloudFront triggered Lamba@Edge 0 times.
- CloudWatch triggered SNS 0 times.
So, there’s 0 outages and my current uptime for 2023 is 100%.
9. Cost of Hosting WordPress on AWS
Self hosting my WordPress blog on AWS costs around $7.48/mo for me. The breakdown below:
| AWS Resource | Cost/mo (USD) |
| 1 reserved EC2 (1GB RAM) | 5.01 |
| VPC | 0.50 |
| Domain name (Route 53) | 1.08 |
| Secrets Manager | 0.80 |
| EFS | 0.09 |
| Total | 7.48 |
Note:
- I use Free Tier eligible EC2s for my Jump host and VAPT instance.
- I haven’t used enough of other AWS resources (like S3 or CloudFront) to be charged.
10. Evaluation
Let’s revisit my design requirements and see if I met them.
✅ Speed (< 2s page load time) – With CloudFront, PHP-FPM, and Redis, my page load time averages around 671ms.
✅ Security – My hosting architecture has AWS access controls and a WAF that protects my blog from most vulnerabilities except for 2 high risk ones; They’re either false positives or useless against my blog.
✅ High Availability (> 95% uptime) – Currently 100% uptime. I deployed my blog on ECS in an ASG. This ensures my blog is always up and running or it will be redeployed automatically. I also have failover plans.
✅ (BONUS) Cheaper than managed cloud hosting – For fair comparison, I looked for provider plans with specs close to my EC2’s (2 Cores, 1GB RAM) and cache, CDN, and WAF included. The cheapest I found was Hostinger’s Cloud Startup plan at $24.99.
11. Final Thoughts
Self hosting a website like WordPress can be inexpensive, secure, and reliable because AWS especially has web hosting solutions even for small businesses and individuals. I covered how I self hosted my own WordPress blog in this article and hope it gives you some ideas.
However, you need to know how to self host a website and you might not have the time, skills, or manpower.
Which is why hosting providers exist.
I reviewed some of them to help you find one.
Check out this provider first 👇.