I want a WordPress blog that makes money online.
So I absolutely need web hosting, but with so many cookie-cutter hosting providers to choose from, I was at a loss until an idea struck.
Why not host it myself?
1. Self-Hosting vs. Managed Hosting
Self-hosting means I set up and manage my own web servers, networking, and firewalls. Managed hosting means I pay a provider to do all of that for me.
In other words, self-hosting is cheaper, but I need the technical know-how.
Thankfully, I know how to host my blog in the Amazon Web Services (AWS) cloud.
Then I got really curious.
Can my self-hosting match or even beat managed hosting?
2. My Self-Hosting Requirements
Using the AWS Well-Architected Framework as my North Star, I decided my design had to be:
- Fast: A sub-1s Largest Contentful Paint (LCP). This is probably the most important for your business—faster LCP → better SEO → more traffic → more revenue. Google considers anything under 2.5s good, but I want better.
- Secure: Most people don’t know how to secure their websites. As a tech bro, I have no excuse.
- Highly available: Or at least fault tolerant enough to recover from downtime automatically.
- Cost-Effective: It has to be cheaper than managed hosting. After all, I am doing the technical heavy lifting myself (though I love it). Otherwise, why self-host?
3. Not My First Rodeo
Sounds good on paper but actually, I ran this blog on AWS Elastic Container Service for a week before pulling the plug for a few reasons:
- Turns out, this ain’t cheap. This was my biggest gripe. I had already reserved a t3.micro EC2 instance for a year at ~$5/mo, but then AWS began charging for public IPv4 addresses at $0.005 per hour in February 2024. At first, that didn’t sound too bad, until I realized that running it 24/7 tacked on an extra $3.65/mo. That’s a 72% increase in my server costs alone!
- Too many moving parts. Now that we’ve established I was cheap, I avoided more expensive AWS managed services like Load Balancers and AWS WAF in favor of open-source alternatives like Nginx and ModSecurity. This meant I was on the hook for everything: security patching, version upgrades, and troubleshooting whatever broke next.
- A DIY safety net held together by duct tape. And things were always so close to breaking. Since I wasn’t using an ALB, I rigged a custom failover plan in case my primary Availability Zone or data center went down. This plan guaranteed my blog would be back up within 4 minutes. Pretty decent Recovery Time Objective (RTO), but it’s still 4 minutes of downtime. Plus, I could think of plenty of edge cases where the automation would fail, forcing me to intervene manually.
- New game-changing updates from AWS. Honestly, this change was a long time coming. In November 2025, AWS introduced CloudFront flat-rate pricing, which meant that (within certain limits that I will discuss later), CloudFront and AWS WAF are now essentially free. Previously, this setup would have cost at least $5/mo. This finally brings AWS on par with competitors like Cloudflare, GitHub, and Vercel, which have long allowed users to host websites with a free CDN and basic WAF.
So, I headed back to the drawing board. I overhauled the design, though I kept the best parts of the old one.
4. My Self-Hosting Design
To avoid the cost and complexity of my original design, I had to return to basics—to what WordPress really is.
A Quick Refresher
WordPress is a dynamic PHP application. This means it needs an active server and a running MySQL or MariaDB database to function. In business terms, that translates to money burning 24/7, even when no one is visiting.
However, WordPress can actually be exported as a static website. By doing this, I no longer need a live EC2 instance running 24/7, and I can host my blog for practically free. The trade-off? Dynamic features like comments usually break because they rely on PHP to process data.
While my blog is mostly static content, I didn’t want to lose the ability to interact with my readers in real time. I decided my new design would be the best of both worlds: a static frontend for speed and savings, paired with a serverless, dynamic comments section.
The Staging Site
In order to export WordPress as a static site, you first have to build it in its original dynamic form. That’s why I created a private staging site where I can test updates and write posts. To keep costs at rock bottom, I only spin this site up when I’m working on new content.
I reused (and even enhanced) the best parts of my previous design for this staging area:
- ECS Fargate: This is a managed, self-healing orchestrator that ensures my WordPress, Nginx + ModSecurity, and MariaDB containers are always healthy.
- Elastic File System (EFS): This provides encrypted, persistent storage for all my content and media.
- CloudWatch: My eyes and ears, providing full observability of my staging site through logs and performance metrics.
- Private ECR & CodeBuild: While I always use the latest official Docker images for WordPress and MariaDB, my Nginx + ModSecurity WAF is a custom build. I use AWS CodeBuild to automatically build and push this custom image to my private Elastic Container Registry (ECR) whenever I launch the staging site.
- VPC: This ensures my resources are isolated in their own network, tucked away from public access.
- Application Load Balancers (ALB): I use two ALBs to segment my traffic (Split-horizon DNS). The public ALB acts as my entry point from the internet, while the internal ALB handles the static export process within the VPC.
- Security Groups & Zero-Trust: This is where the actual protection starts. I use Security Groups as Layer 4 firewalls to lock down the public ALB to my specific IP address and to bridge communication between my containers. Combined with strict IAM Policies, I’m able to enforce the Principle of Least Privilege, ensuring nothing has more permissions than it strictly needs.
- Nginx + ModSecurity WAF: This is my Layer 7 defense. It’s configured to protect against common WordPress vulnerabilities like the OWASP Top 10 (e.g., SQL injection), deny access to sensitive files and paths (even for myself), and enforce my strict Security Headers and Content Security Policies.
The Static Exporter
Inspired by the Simply Static plugin, I vibe-coded a Lambda function to crawl my staging site. It pulls my HTML, CSS, and images through the internal ALB and dumps them into an S3 bucket.
The Production Site (My Actual Blog)
This is what you are reading right now. These static files are served via CloudFront to readers all over the world. Because I’m using the new flat-rate pricing plan, I get both CloudFront and AWS WAF for free. I also use Origin Access Control (OAC) to ensure no one can bypass the CDN to hit my S3 bucket directly, while CloudFront Functions handle the heavy lifting of enforcing my Security Headers and Content Security Policies at the edge.
Most importantly, those same CloudFront Functions inject my API key into the request securely, allowing the site to communicate with the comments section without exposing my credentials to the public.
The Comments API
It’s a free Disqus without ads and the only dynamic feature on my otherwise static site. To make it work, I built a serverless API using API Gateway, Lambda, and DynamoDB. Here is how my comments section functions:
- Reading: When a page loads, a script calls the API, and a Lambda function fetches the existing comments from DynamoDB to populate the section.
- Writing: When you leave a comment, it triggers a Lambda that runs the text through AWS Guardrails. This acts as my automated moderator, checking for harmful content before the comment is ever allowed to be posted. I will share more about this in a later section.
What’s Under the Hood?
Having said that, here’s a visual overview of the architecture that underpins my blog.
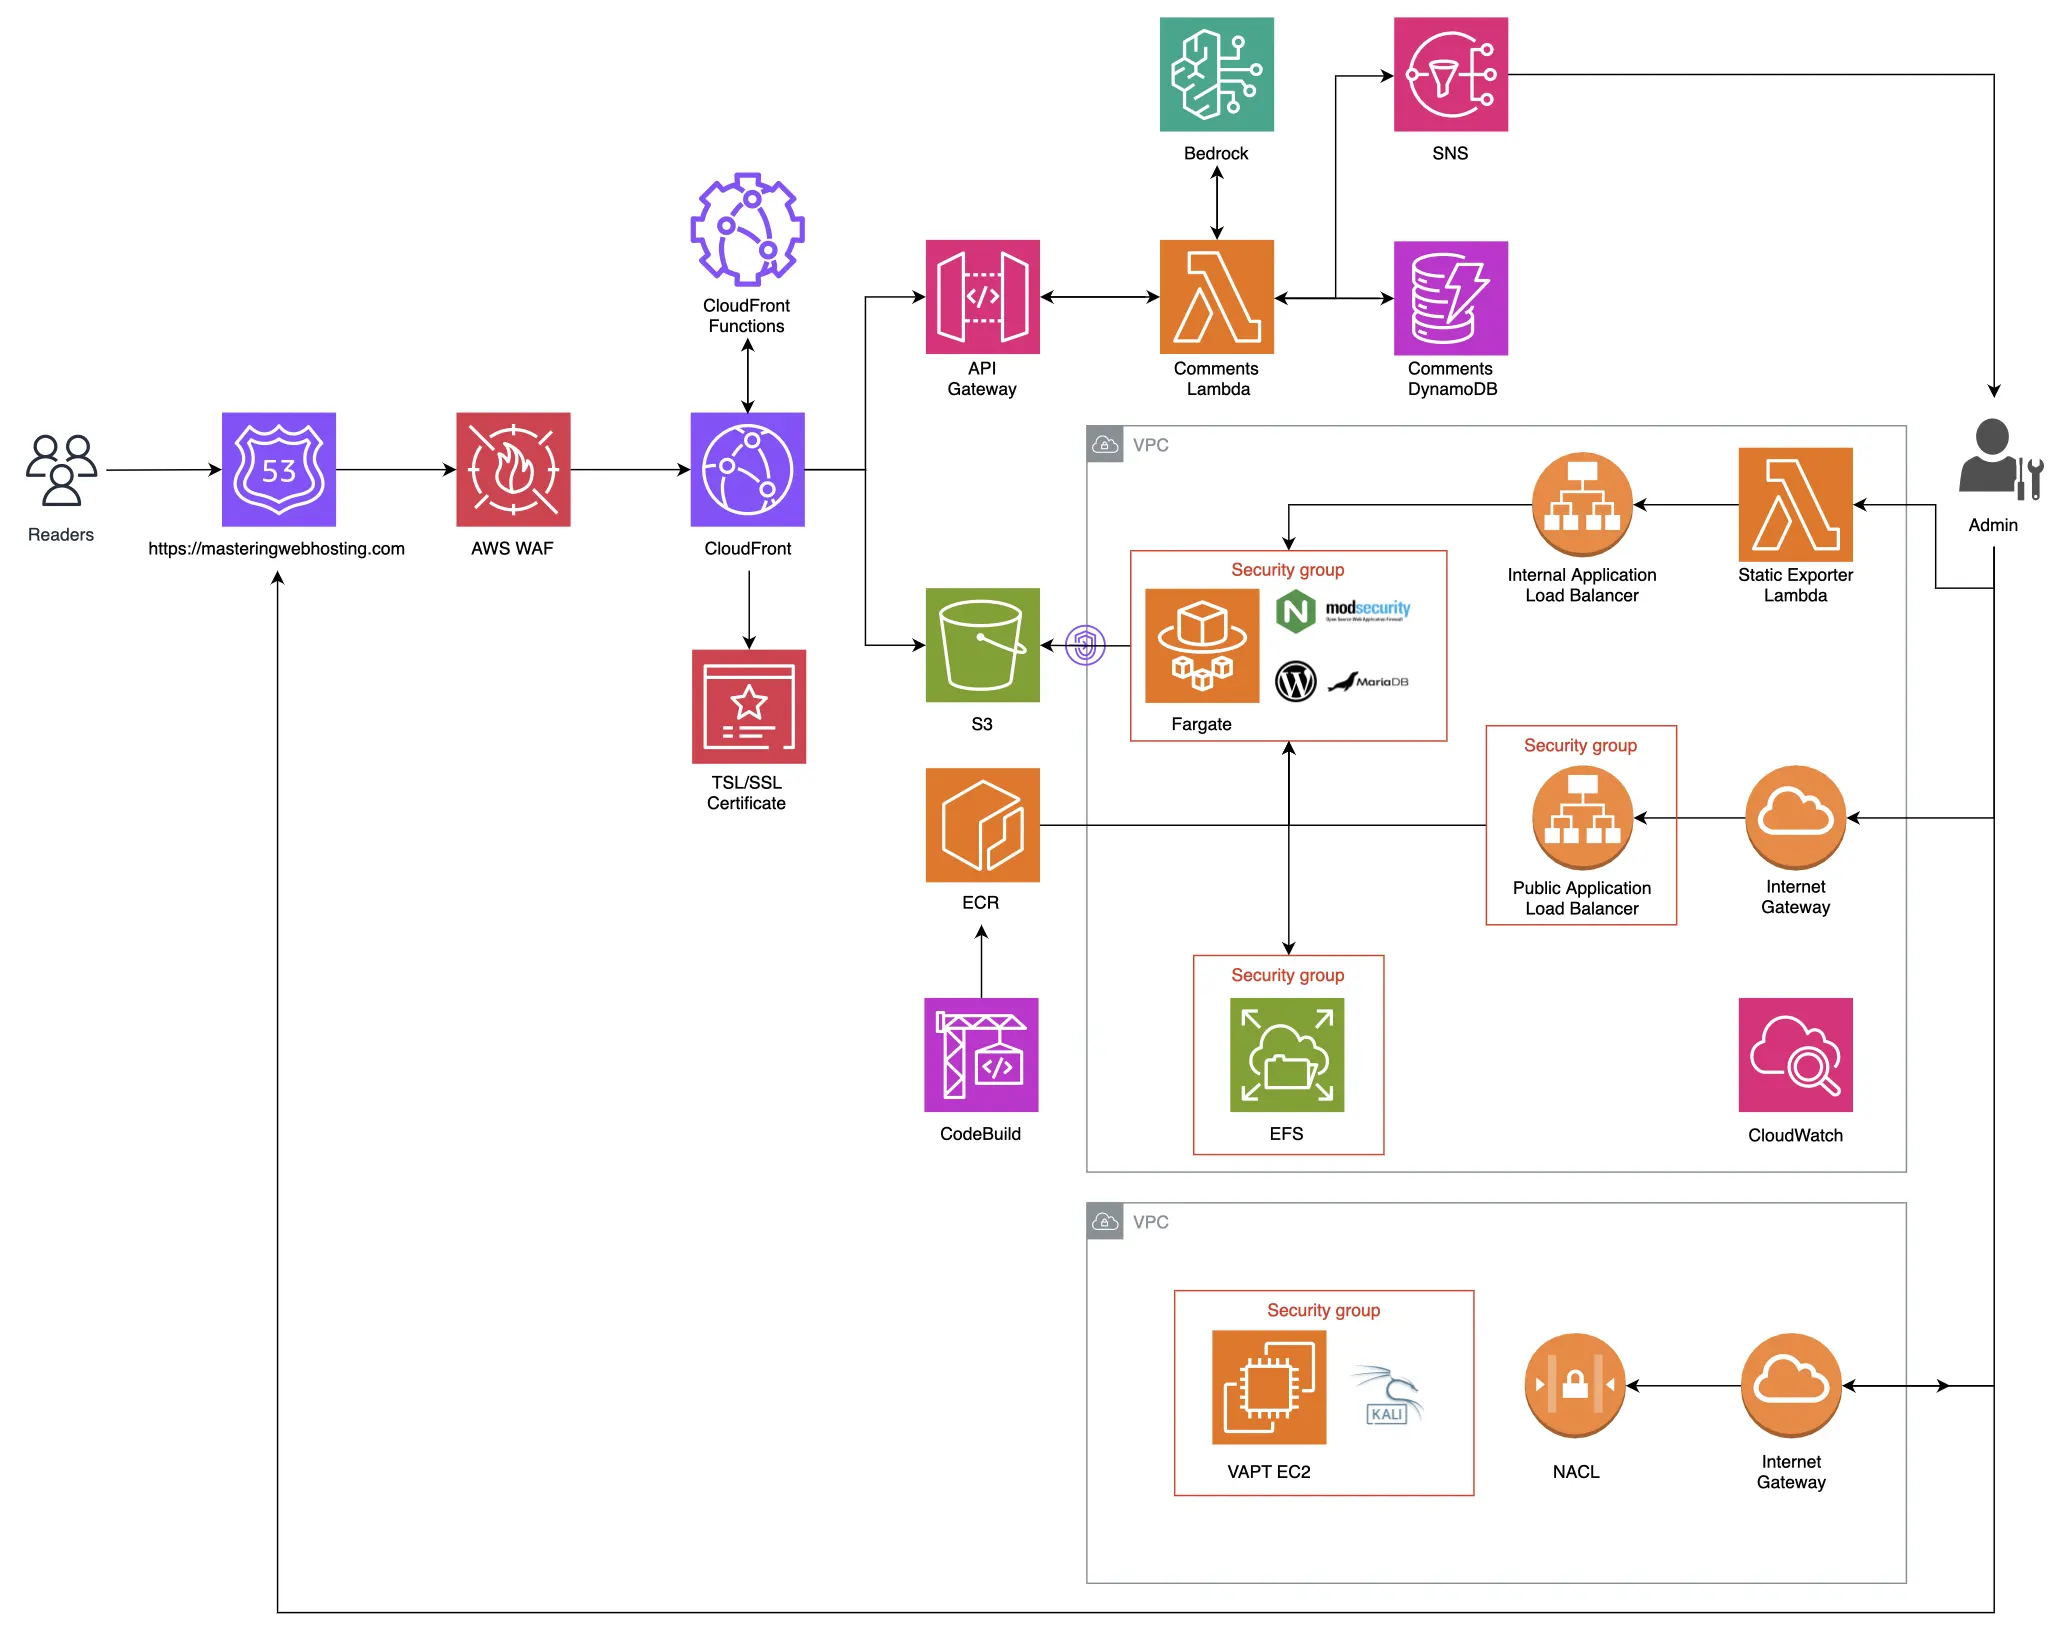
The real power lies in how all those services are tuned though.
Let’s look closer at the specific speed, security, and uptime features I implemented to turn this pennies-a-month stack into a platform that meets my self-hosting requirements and actually beats the performance of premium managed hosts.
5. Speed Features
CloudFront CDN
The primary reason why my blog feels snappy no matter where you are in the world. By moving my blog content to the edge, CloudFront brings it closer to you.
And by edge, I mean a massive network of 750+ Points of Presence (PoP) across 100+ cities and 50+ countries. Instead of forcing your traffic to travel all the way to the specific S3 bucket where my files are, CloudFront caches its contents in PoPs globally. You are automatically directed to the closest one, making my web pages load significantly faster for you.
It’s not just S3, either. My CloudFront distribution has two origins: one for hosting my static content (S3) and another for my dynamic Comments API (API Gateway). This means I need two distinct caching strategies:
- Static Content (S3) Since all my static files (HTML, CSS, JS, and images) are in S3, they need to stay cached at the edge for as long as possible.
- The Strategy: I use the appropriate Cache Policies and long TTLs (Time-to-Live). The goal is a high Cache Hit Ratio, meaning my readers almost always get an instant page load from their local PoP.
- The Refresh: Because long TTLs can lead to stale content, I trigger an invalidation in CloudFront whenever I export a new batch of files. This flushes the global cache, ensuring the latest version of my blog is live everywhere within seconds.
- Comments API (API Gateway) My comments section is dynamic, so I decided against caching existing comments (for now) to ensure my readers see their posts immediately upon approval.
- The Speed Win: Even without caching, CloudFront speeds this up by handling the SSL/TLS handshake at the edge location nearest to you. This saves the multiple rounds of back-and-forth communication that would otherwise be required to establish a secure connection with a distant origin server.
Route 53
Finally, I chose Route 53 as my DNS. I mapped my domain to my CloudFront distribution using Alias records within a hosted zone. Route 53 and CloudFront work together seamlessly; it can resolve a request to CloudFront internally and return an IP address immediately, making the initial connection even faster.
In fact, my CloudFront distribution is what you are accessing right now when you enter my URL in your browser.
6. Security Features
CloudFront CDN
As the gateway to my blog, CloudFront isn’t just a cache; it’s my first line of defense with features like:
- DDoS Protection with AWS Shield (Standard) at no extra cost.
- Geographic Restrictions: I whitelisted traffic from specific regions like the US.
- Origin Access Control (OAC): The S3 bucket that stores my blog content is strictly private; CloudFront gets its contents by signing requests with AWS SigV4. This ensures that my bucket remains publicly inaccessible and only accepts traffic from CloudFront.
- Origin Request Policies: Only requests from my domain can reach my API Gateway via CloudFront
- CloudFront Functions: Lightweight scripts that run at the edge to:
- Inject my API Keys: Instead of hardcoding my keys in my frontend code, I inject them into the request header at the edge. They are passed securely to my API Gateway for authorization without ever being exposed in a browser.
- Block direct API access: By verifying a shared secret header, I ensure that my API Gateway only responds to requests coming from my CloudFront distribution and domain.
- Block common bots, hotlinking, and requests to sensitive paths like /wp-login.php, so my origins don’t waste resources processing them.
- Enforce Security Headers, especially my Content Security Policies: This tells your browser exactly which scripts are safe to run, effectively neutralizing XSS and clickjacking threats.
- Seamless integration with AWS WAF: Coming up next.
AWS WAF
Much like the ModSecurity WAF in my staging site, AWS WAF provides a robust layer of protection against web-based attacks:
- Managed Policies: I don’t want to go into detail, but one policy I use is the AWSManagedRulesCommonRuleSet, which protects against common web vulnerabilities while staying compatible with WordPress.
- Custom Rate Limiting: To prevent denial of wallet attacks, I’ve implemented my own policy that blocks IP addresses exhibiting suspicious traffic spikes or brute-force behavior.
Encryption Everywhere
AWS and I treat all data as sensitive, which is why encryption is baked into every layer of my architecture:
- In Transit: I use AWS Certificate Manager (ACM) to provide a free TLS certificate for my domain. CloudFront enforces HTTPS, ensuring the traffic between my blog and my readers is encrypted.
- At Rest: Both my static content in S3 and my readers’ comments in DynamoDB are encrypted by default, keeping the data safe even when it’s just sitting in storage.
IAM Permissions
I follow the Principle of Least Privilege for my Comments Lambda. Its IAM role is heavily restricted: it can read and write new comments, but it has no permission to update or delete existing ones. No attacker shall ever wipe my database!
The Ultimate Security: Going Static
Finally, the biggest security win is my architecture itself. By converting my WordPress blog to a static site, I’ve drastically reduced my attack surface. It’s like replacing every door and window with a solid granite wall—even if a hacker has a key, there’s nothing to break into:
- No PHP: No server-side code execution means no Remote Code Execution (RCE).
- No Live SQL Database: SQL Injection attacks have no target.
- No Server to Manage: Attackers can’t exploit WordPress plugins with vulnerabilities.
- No wp-admin or wp-login: No admin portal, user accounts, no credential stuffing.
7. High Availability Features
Serverless
By going serverless, I replaced my previous manual failover plan with AWS’s native Multi-AZ resiliency. This makes my blog even more highly available than my original design. All without spending another cent.
Just to set the record straight: serverless doesn’t mean zero servers.
It simply means that AWS handles the heavy lifting of setting up multiple servers in different locations and configuring complex failover routing behind the scenes.
The best part? I don’t pay for these backup servers while they sit idle.
I just upload my code and content, and AWS manages the infrastructure.
Free enterprise-grade reliability? Sign me up!
Service Level Agreements
In fact, AWS is so confident in the five serverless services powering my blog that they back them with Service Level Agreements (SLAs).
This is a formal promise that these services will meet a baseline uptime every month. If they don’t, AWS issues Service Credits to waive a portion of my bill.
Here’s the reliability I am getting out of the box:
Note on Credits: AWS gives a full 100% waiver only if availability drops below 95%. You can forget about it because that’s a black swan event in the cloud world.
Data Durability
Availability is only half the battle. If the servers are up but my data (my static content) is missing, readers will still see a broken site. This is where S3 shines with its 99.999999999% (that’s 11 nines!) data durability.
To put that in perspective: if you stored 10,000,000 objects in S3, you might lose one every 10,000 years. This is possible because S3 automatically replicates my blog content across at least three physically separate Availability Zones (AZs) or data centers.
And I didn’t just stop at the default settings. To keep my data safe from accidental deletion, I configured two extra layers of protection:
- S3 Versioning: This ensures that my files can’t be permanently deleted by accident. If I delete a file, S3 doesn’t actually erase the data; it simply marks it for deletion. If I overwrite it, S3 automatically serves the newest version to my readers while moving the previous version to the background as Noncurrent. It’s like having an infinite Undo button for my entire blog.
- Lifecycle Configurations: To keep my S3 storage costs from spiraling out of control with old versions, I use a Lifecycle Policy. It permanently purges noncurrent versions only after they have been marked for deletion for 30 days. This gives me a full month to recover any data before a file is gone for good.
CloudFront
Even in the extremely rare case where S3 is down or my data is lost, CloudFront acts as my final safety net. It can be configured to serve cached versions of my content even if my S3 Origin is temporarily unavailable. It’s not always ideal, but in a crisis, stale content beats no content.
8. Infrastructure as Code
For the final step of my migration, I switched from CloudFormation to Terraform to provision my environment.
Honestly, I found CloudFormation rather rigid and verbose, and Terraform far more flexible and easier to write. For instance, Terraform lets me use logic like loops and dynamic blocks that feel much more intuitive. Terraform is also cloud-agnostic; if I ever decide to migrate to another cloud provider like GCP, I can take my Terraform skills and configurations with me to provision an environment there.
Just like in my previous setup, I use variables to ensure no sensitive information is ever hard-coded into my public GitHub repositories.
9. Speed Test
Largest Contentful Paint (LCP)
GTMetrix reported this design clocked in at 306ms in Dallas and 253ms in London.
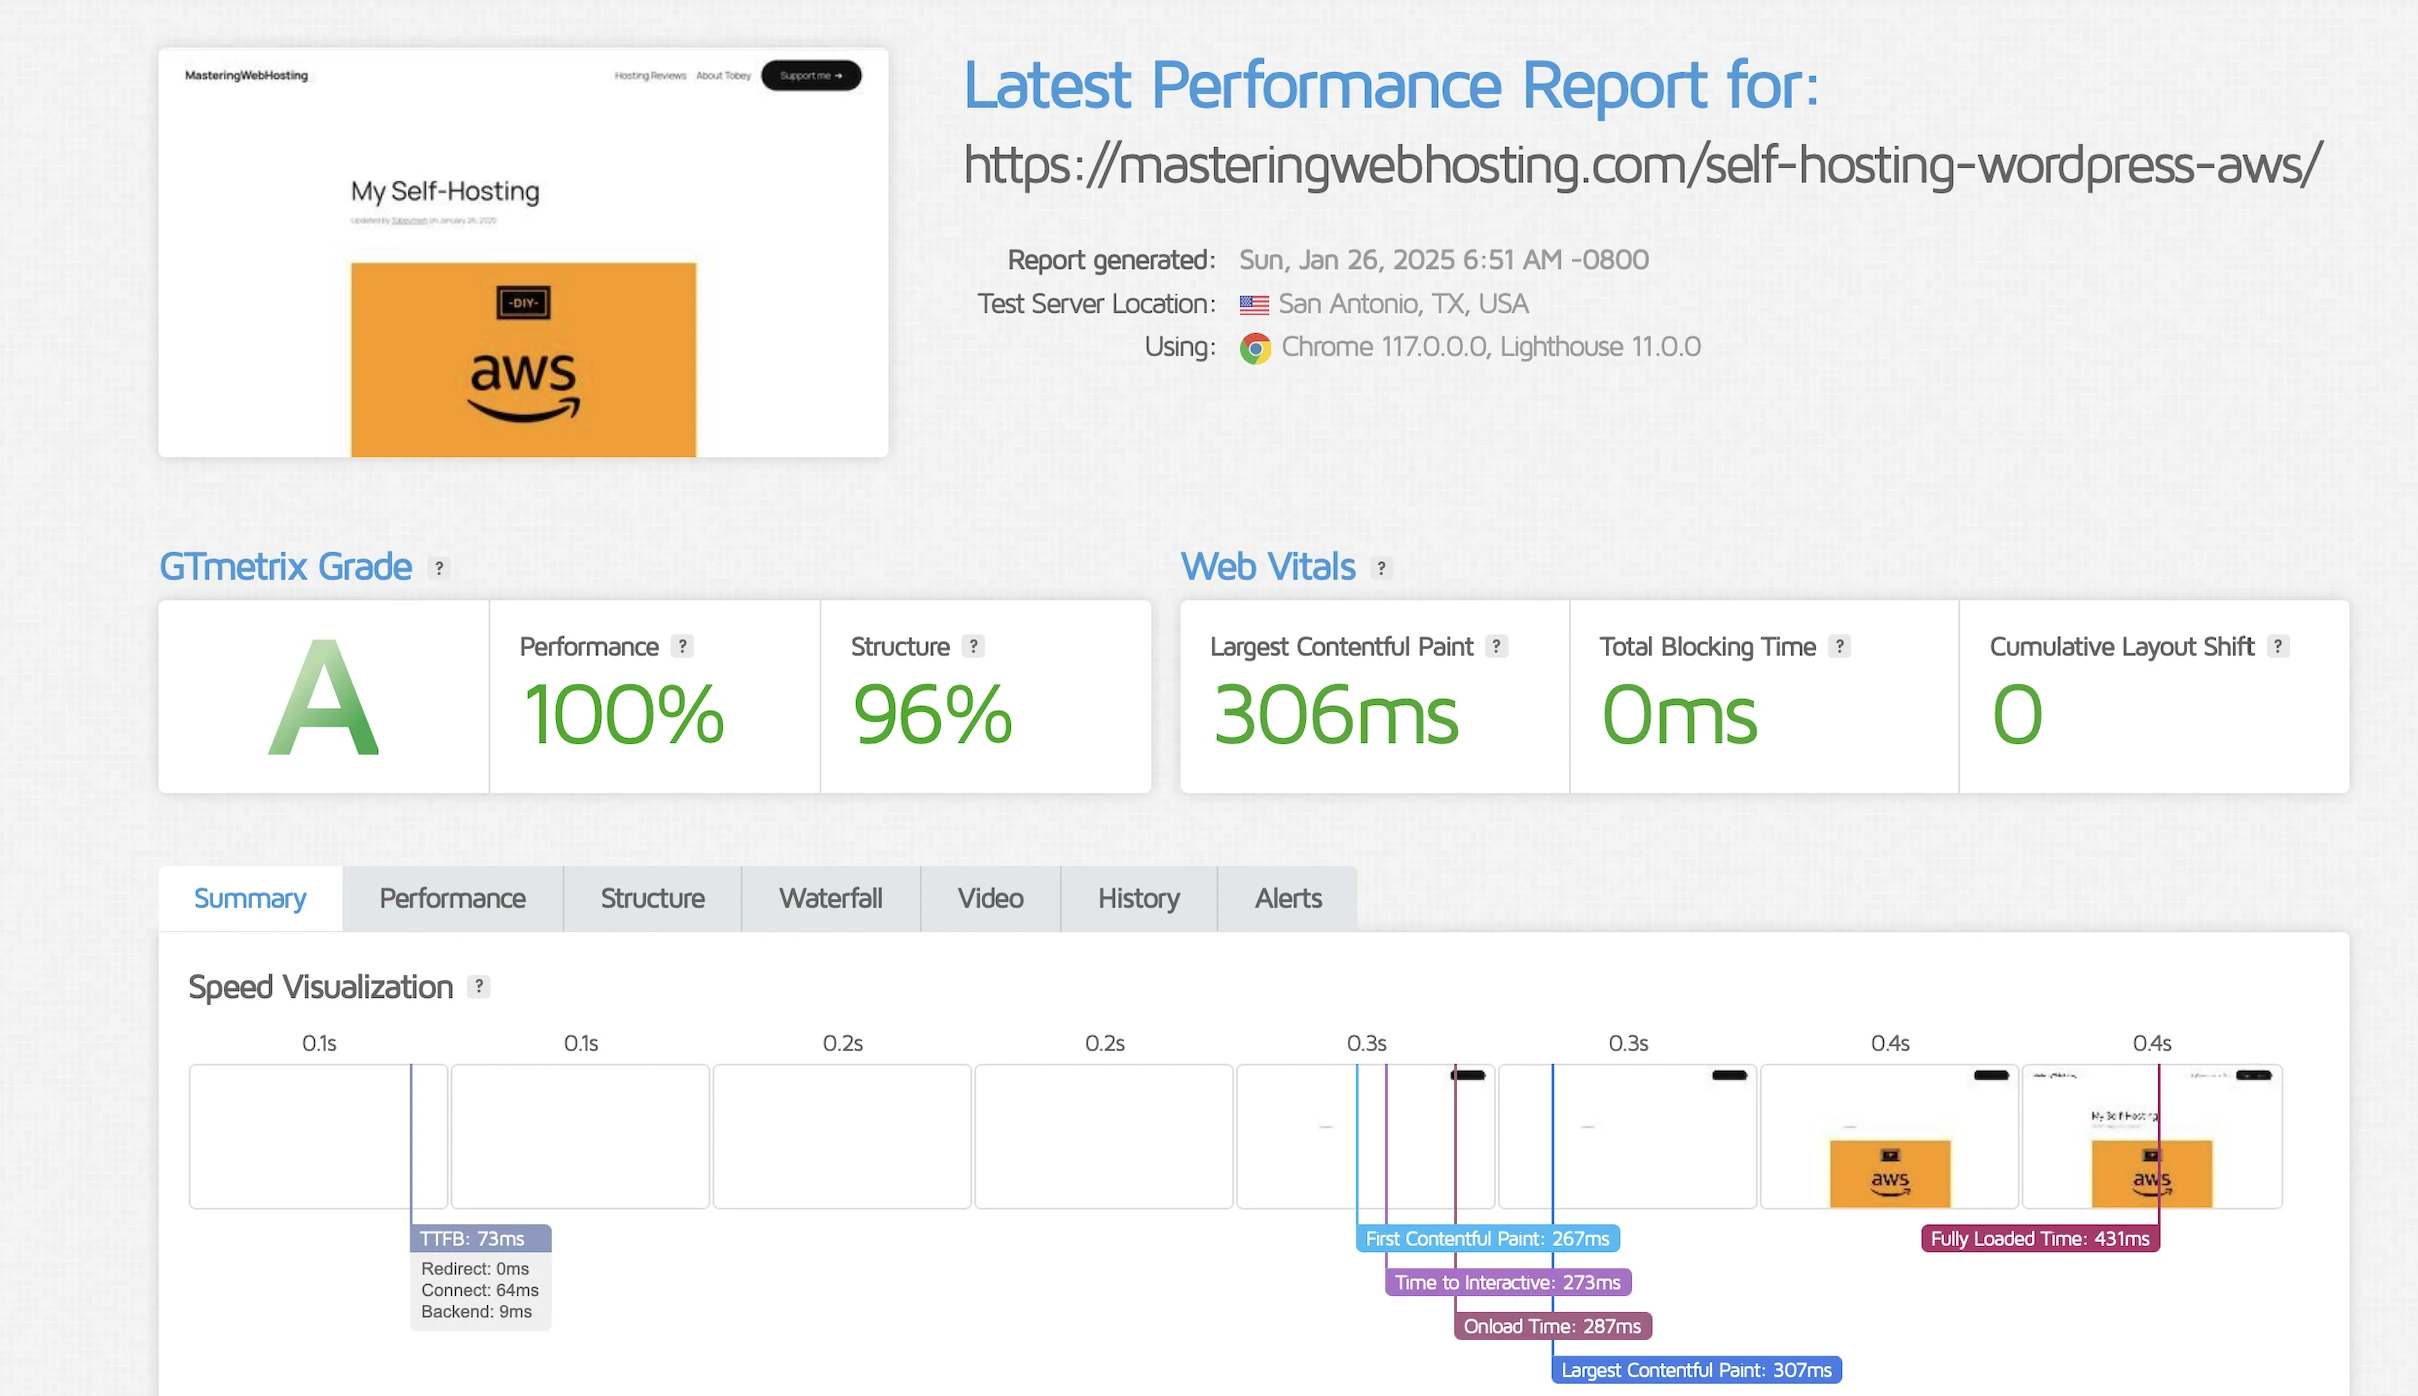

Holy cow, that’s more than 3x faster than my original requirement!
Time to First Byte (TTFB)
I wanted a real-world benchmark to see how my design stacked up against premium hosts who tout their proprietary CDNs or “lightning-fast” TTFB.
SpeedVitals gave my site an A grade, with a global TTFB average of 90ms.
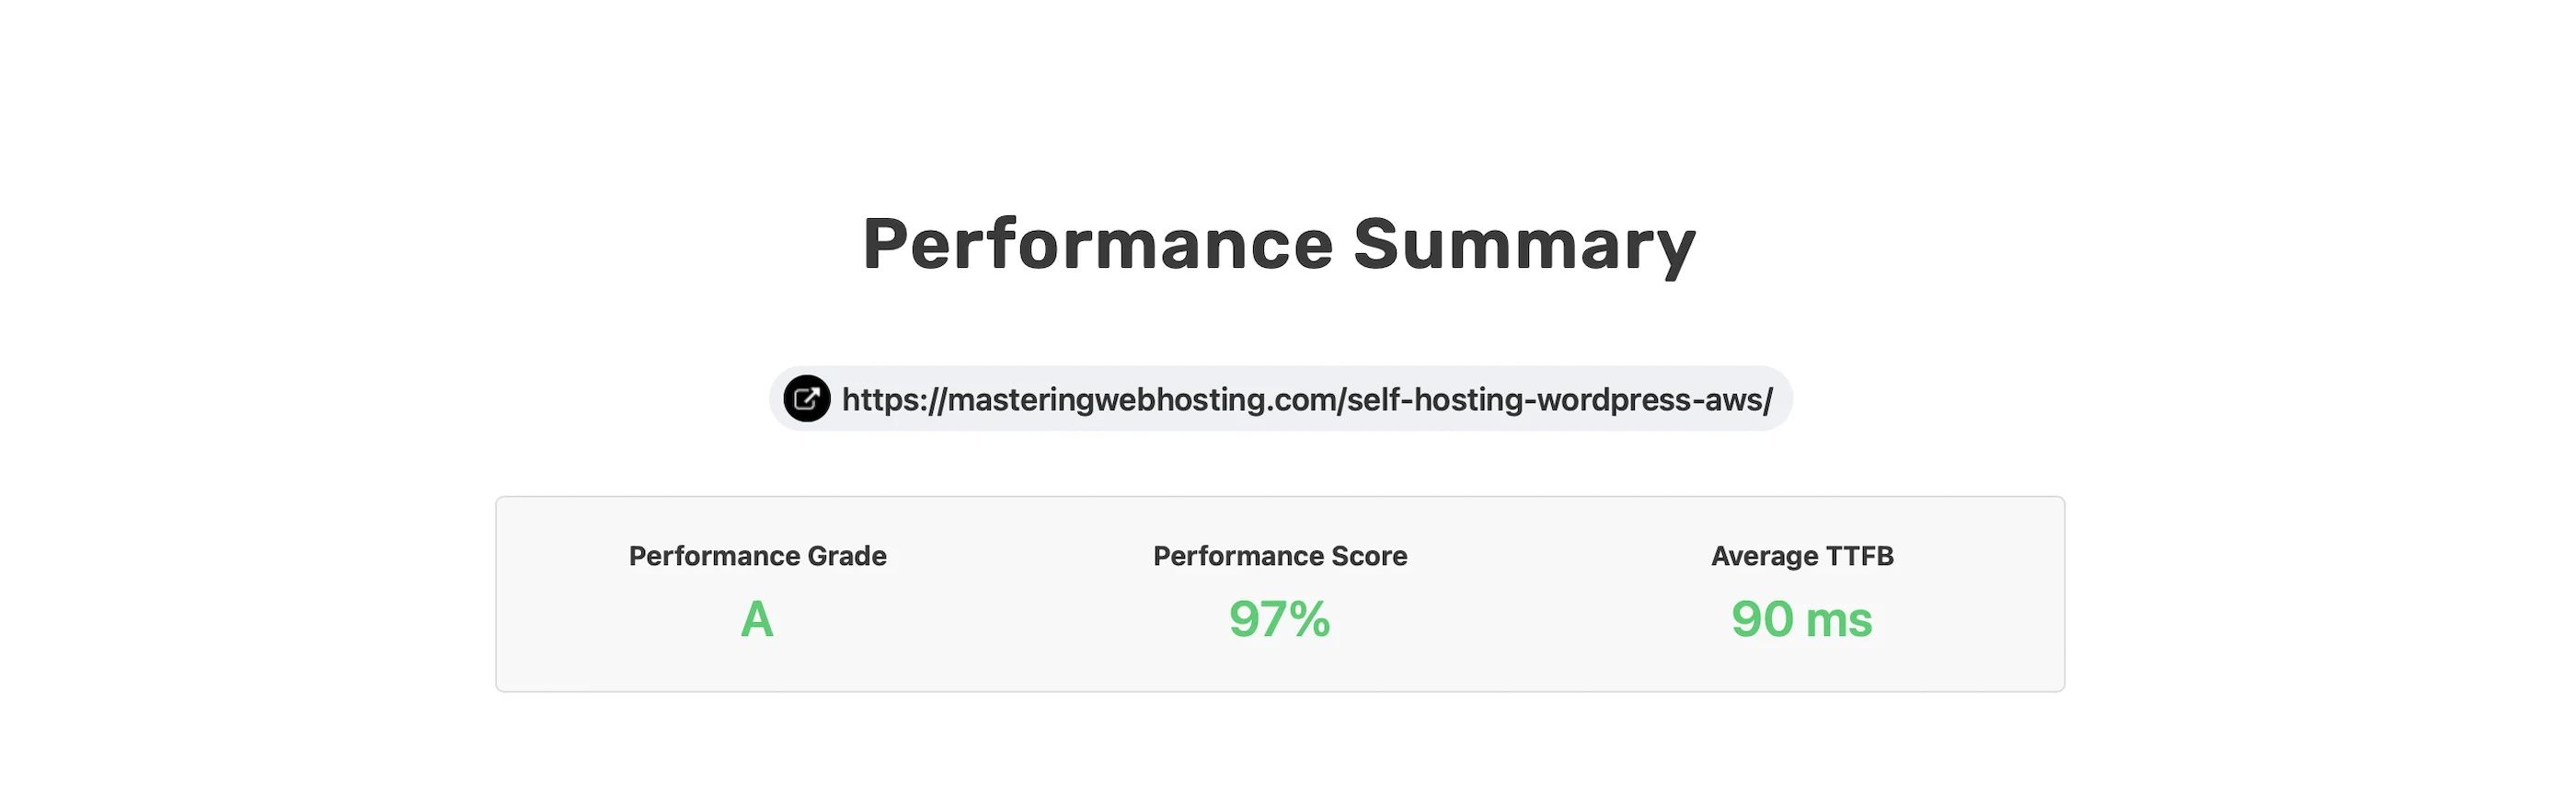
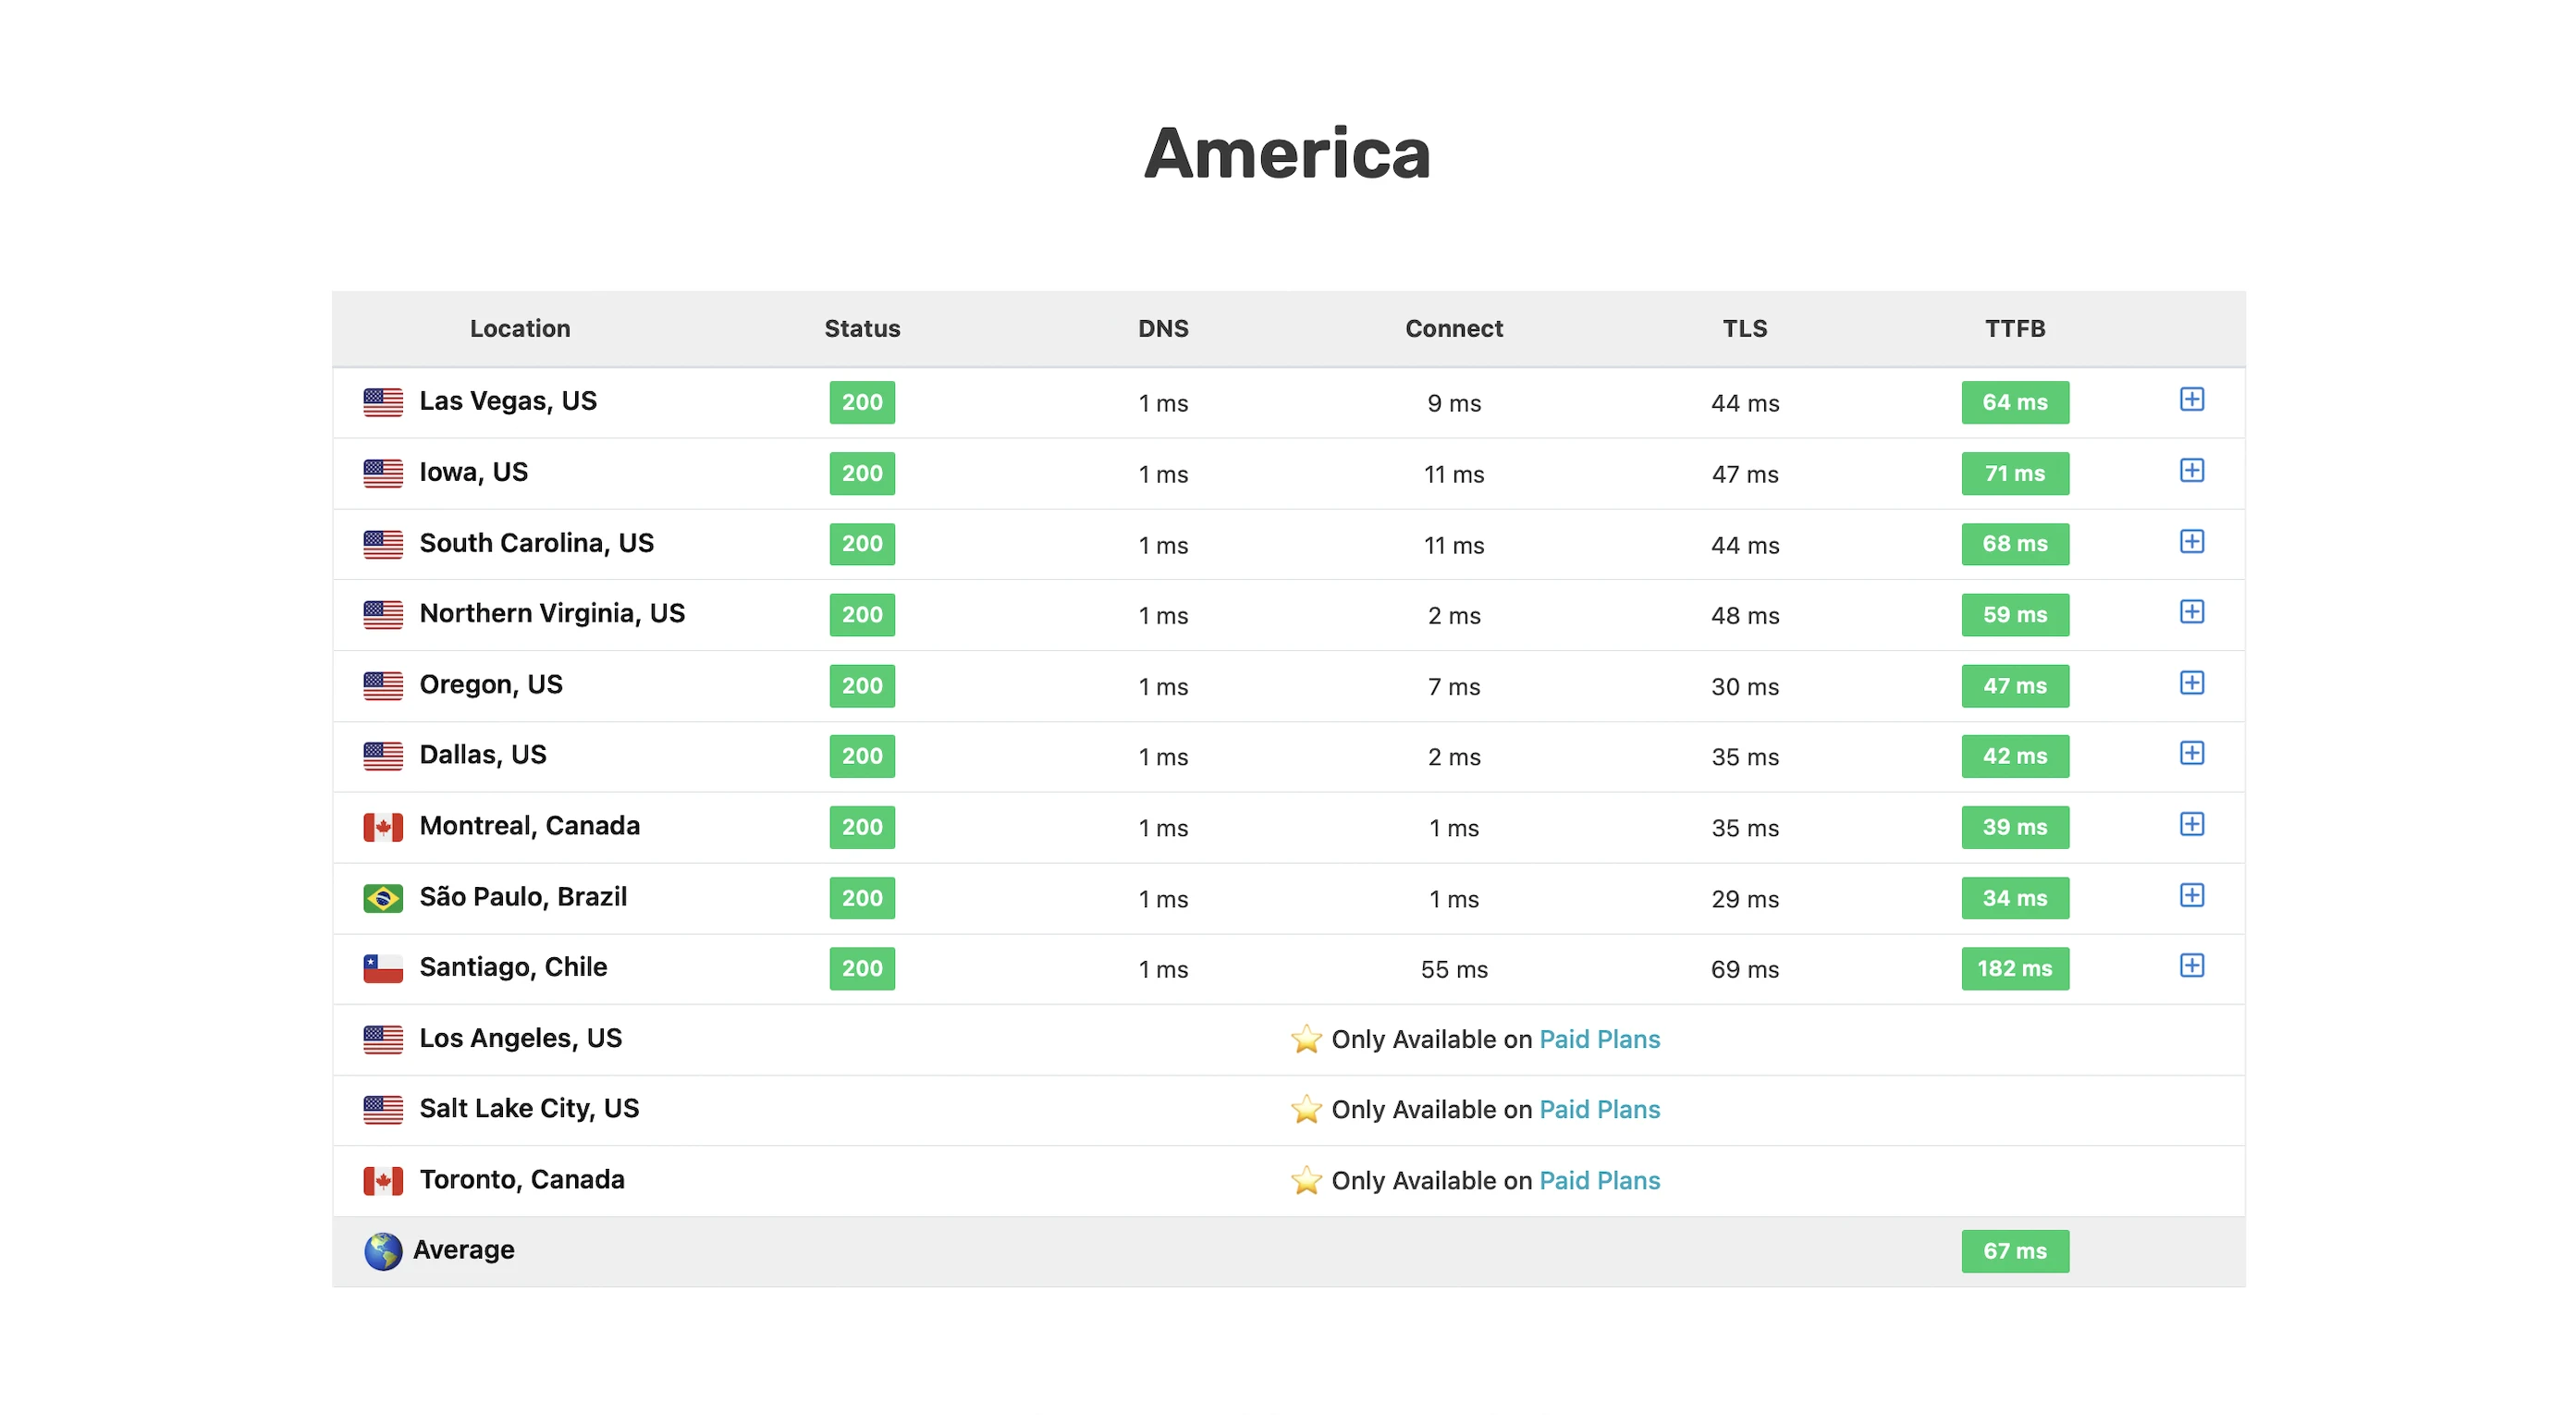
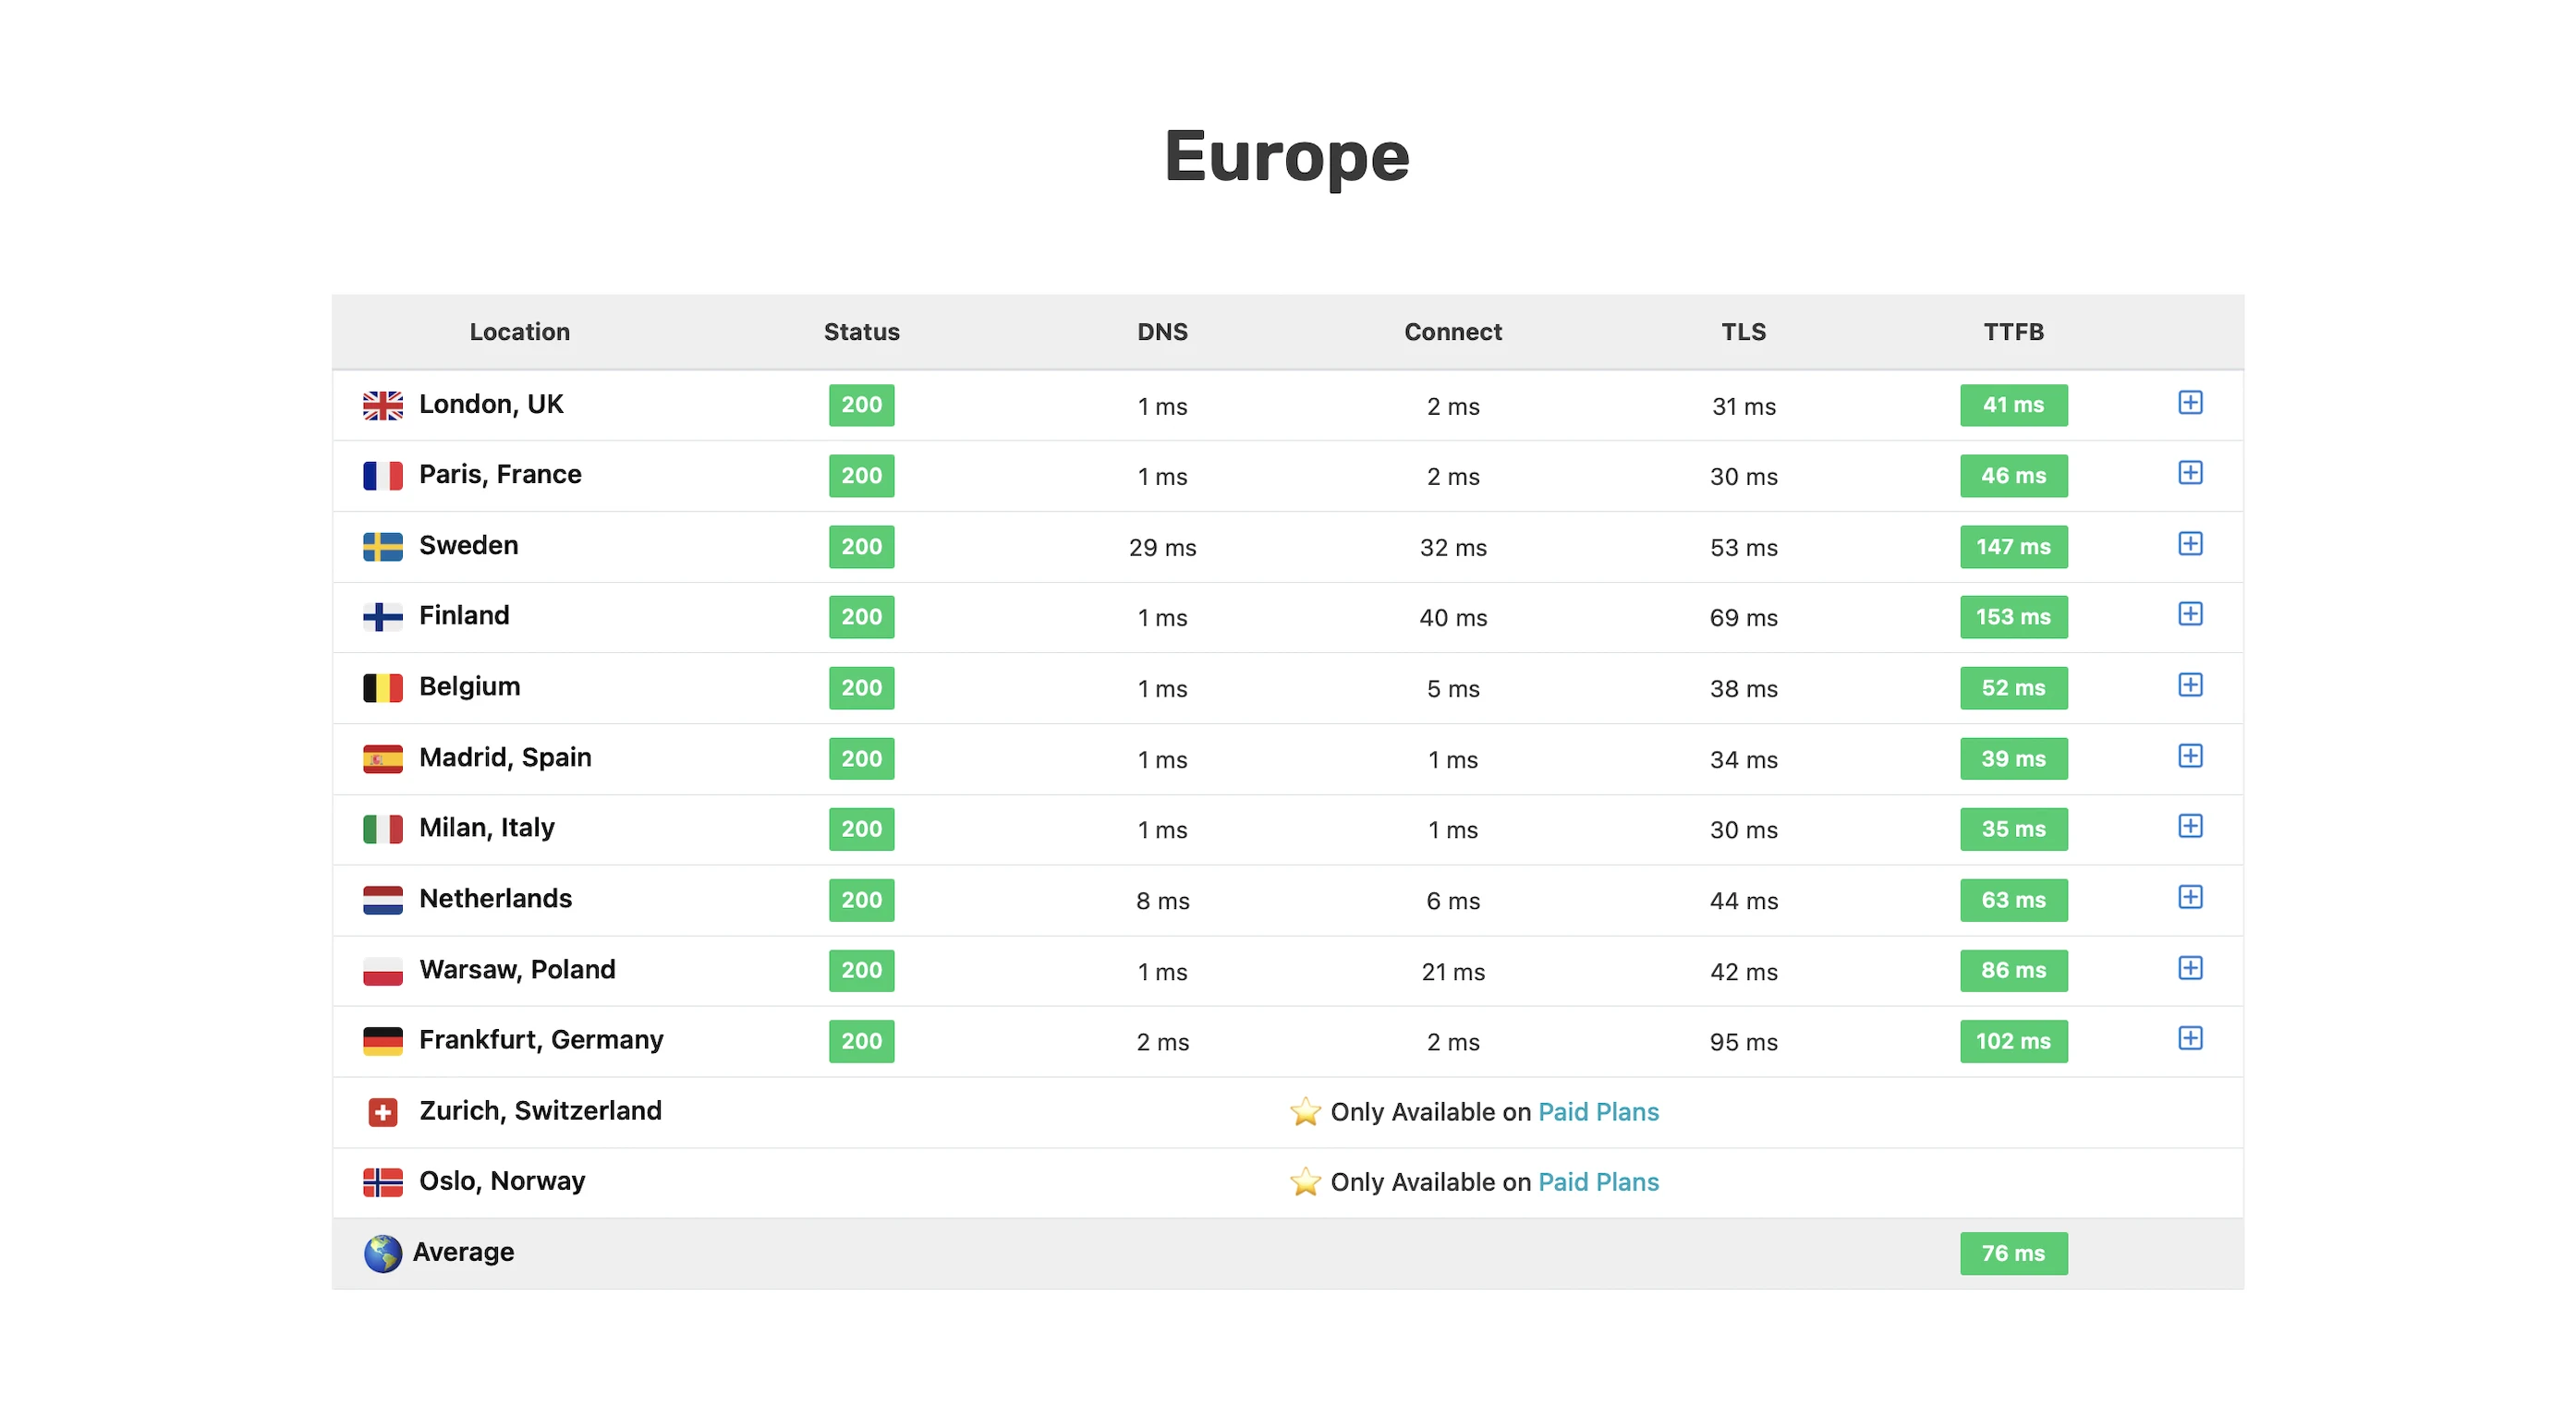

Overall, not bad at all for a self-hosting solution!
10. Security Test
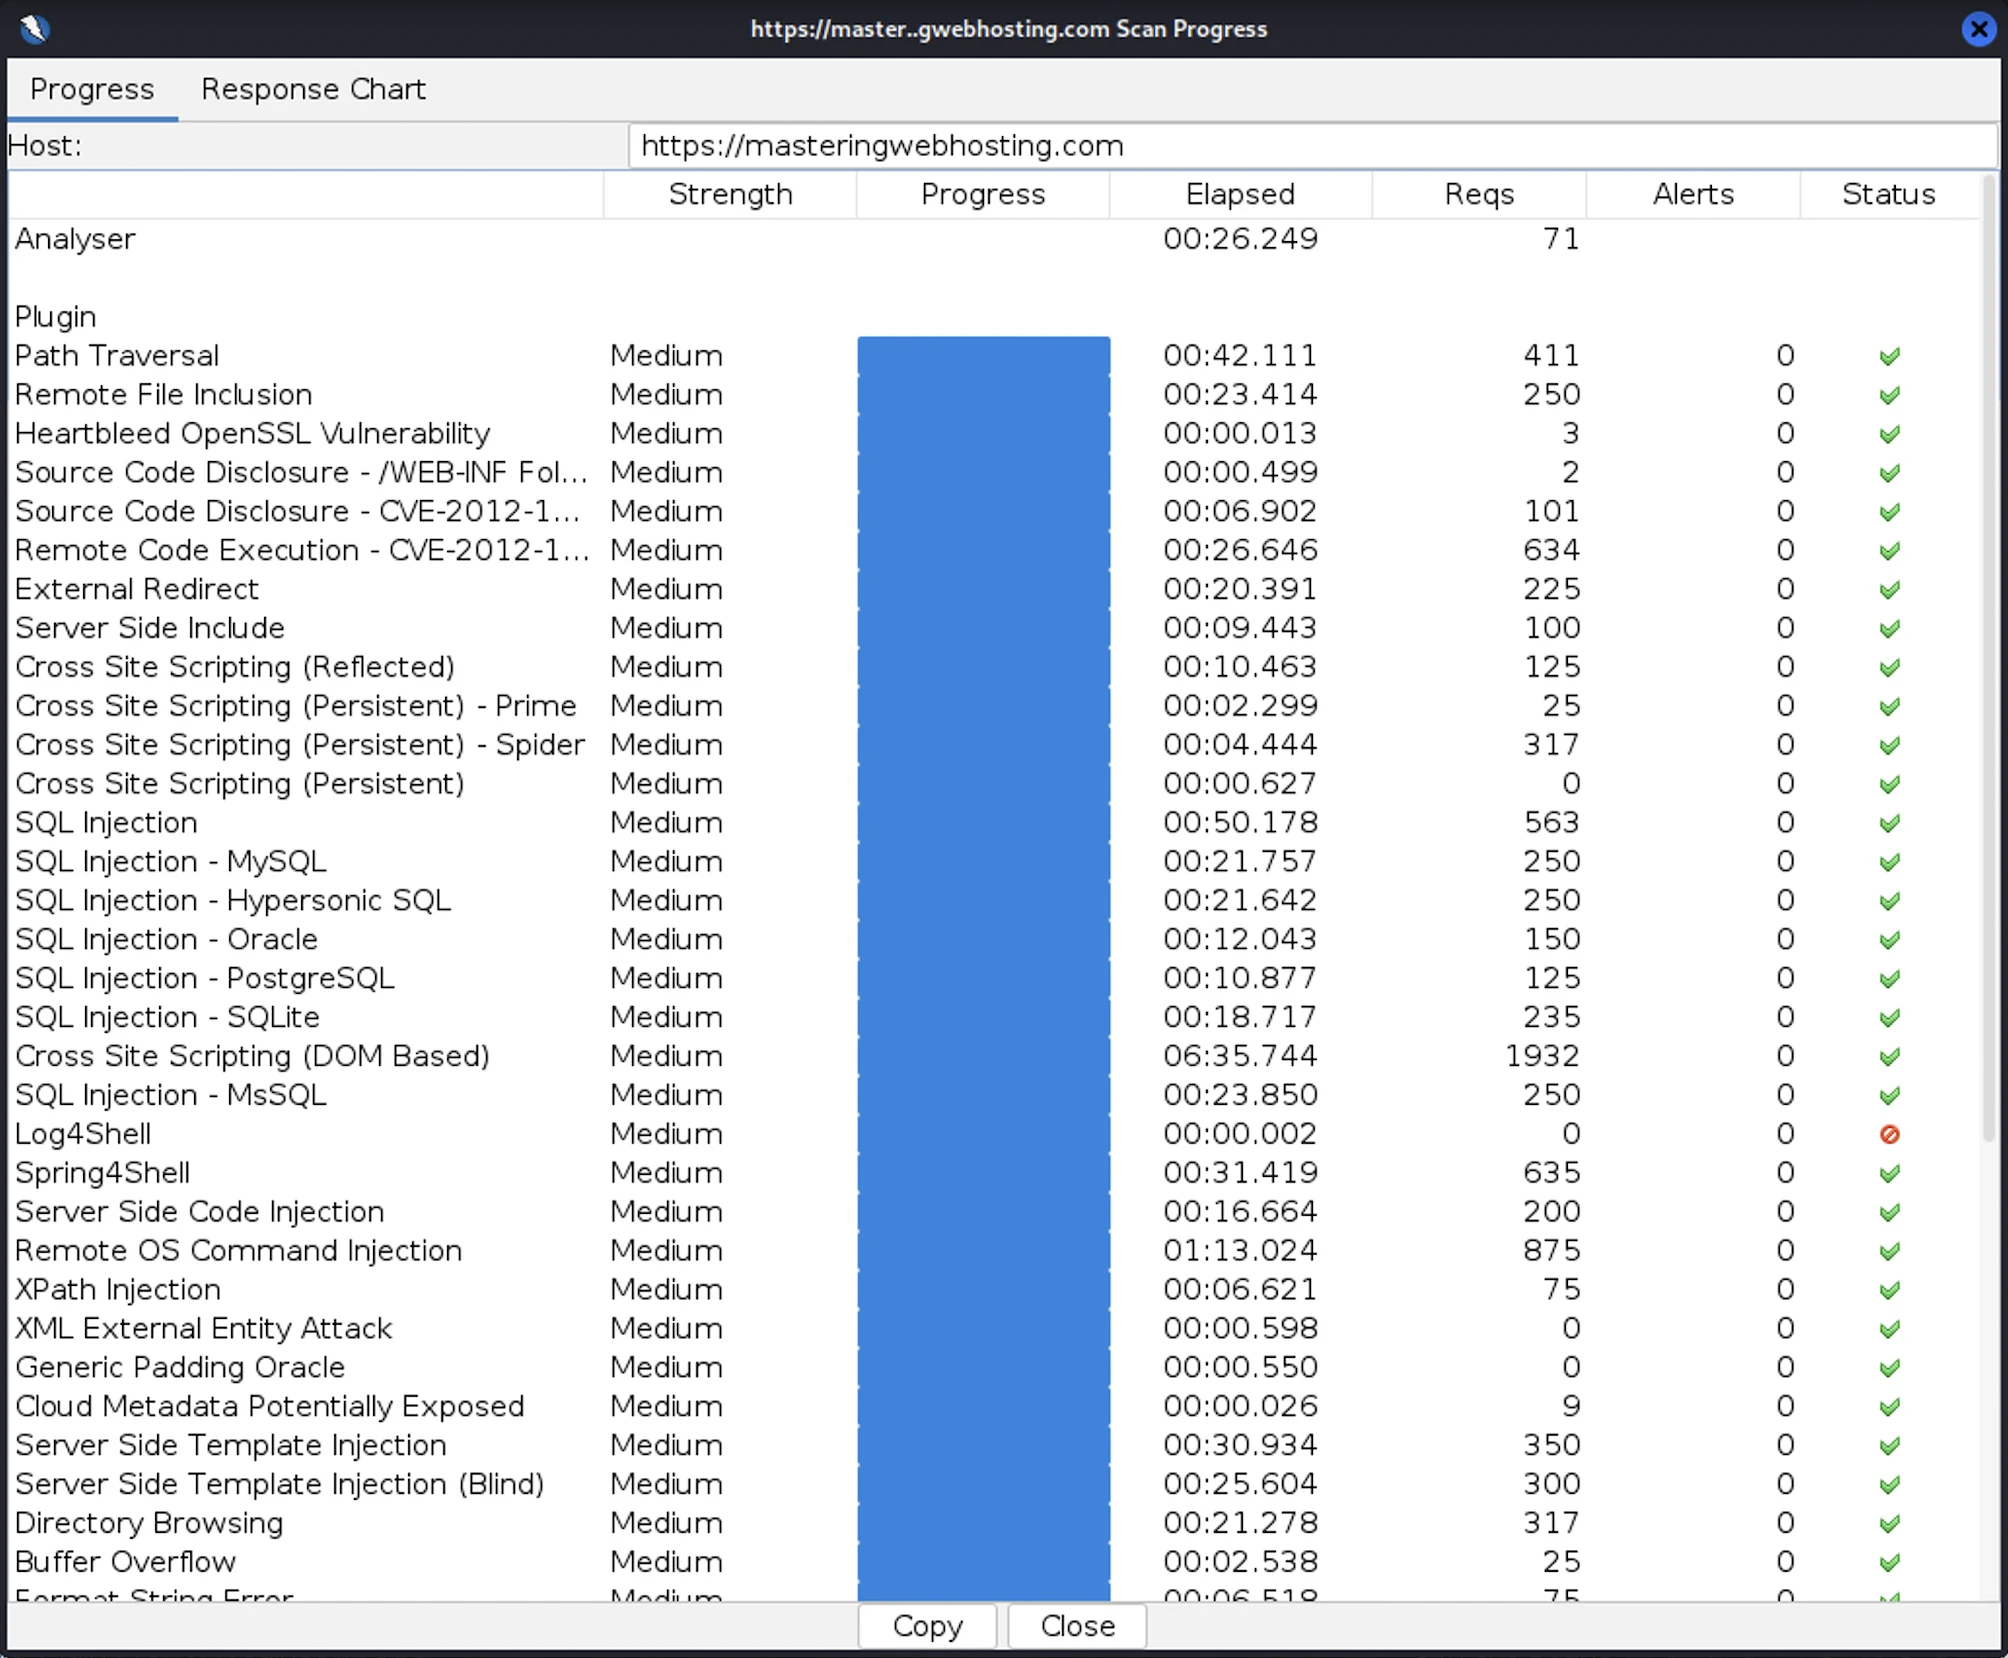
After all that hardening, I wanted to test how secure my blog is. So, I provisioned a Kali Linux EC2 and ran a Vulnerability Assessment and Penetration Testing (VAPT) using Zed Attack Proxy.
I launched 15,508 cyber-attacks against my blog. The results:
- High Risk Vulnerabilities: 0 detected.
- Medium Risk Vulnerabilities: 0 detected.
- Informational Alerts: 1, but this isn’t a vulnerability.
- Success Rate: 95.6% of attacks were completely neutralized by the WAF.

Fun Fact: I actually had to run my VAPT twice. My ModSecurity rate-limiting rules were so effective that they identified my Kali Linux instance as a DoS threat and blacklisted my IP within the first few minutes. I had to temporarily disable these rules just to finish the scan. It’s great to know that my DoS protection works exactly as intended.
11. Uptime Test
I ran this EC2-based design for a full week as a production stress test. While I hadn’t started using third-party monitoring tools like UptimeRobot then, I relied on my CloudWatch Alarms and SNS to notify me of downtime.
Zero alerts.
Throughout this production run, my stack maintained zero observed downtime. My SNS topic remained silent, confirming that the instance health checks never failed and that the system comfortably operated within the high-availability standards (99.5% uptime) expected of a professional AWS deployment.
More importantly, I verified the design before go-live. My automated failover tests confirmed a Recovery Time Objective (RTO) of under 4 minutes. I didn’t just trust the cloud; I engineered a way to ensure that if a failure did occur, my blog would revive itself before a user even had time to react.
12. And of course, AI
The Problem
With managed hosts (and pretty much everyone else) jumping on the AI bandwagon, I started getting serious FOMO. However, I stood my ground: I wanted to do it with purpose. I don’t believe in using something just because it’s trendy. It must solve a problem, or I’d end up paying for and maintaining something I don’t need.
In my design, that problem was manual comment moderation. I wanted a system that could police itself so I wouldn’t have to spend my time manually deleting spam or offensive content.
AWS Bedrock Guardrails
Enter my AI-powered moderator and gatekeeper for my comments section. I configured Bedrock Guardrails to automatically block comments with:
- Offensive Language
- Sensitive Information
- Irrelevant Topics. Ensuring the conversation stays focused on hosting and the cloud.
- Prompt Injection Attacks (Bonus): Just like web apps have an OWASP Top 10, LLMs have their own OWASP list of common vulnerabilities, with Prompt Injection sitting at the very top. This is when a malicious user tries to hijack an AI by instructing it to ignore its original rules and to perform unauthorized actions, such as leaking customer data. While I don’t have a public LLM to hack yet, it’s still cool to future-proof my blog against modern AI attacks.
How it Works
This is a key part of my dynamic comments system. When a reader posts a comment via my API, it is instantly passed to Bedrock Guardrails for assessment. If the comment violates my community or security guidelines, it is blocked before it ever touches my comments section. The user simply gets a polite notification instead:
[Insert screenshot of your "Comment Blocked" pop-up here]
Sick.
And the best part? It’s practically free.
Try it for yourself! Leave a comment (keep it clean) and see my moderator in action.
13. Limitations
If you were to test my comments system thoroughly, you’d find some loopholes. My AI moderator isn’t perfect, and neither is the rest of my design.
AI Missed Some Irrelevant Comments
For this to work, I needed to fine-tune Bedrock Guardrails with examples of irrelevant topics to filter comments. It works for most cases, but a few edge cases still slip through. It’s a work in progress that I think needs more representative data.
Twenty Twenty-Five Theme Only
I’ve only validated this design, especially my Comments API, on this specific theme. It would likely work on other default WordPress themes, but premium ones would definitely require some custom tweaks.
CloudFront Free Plan Itself
What? You didn’t think AWS was gonna give me everything for free, right? The Free Plan is missing some useful stuff. It’s a shame, but most of it has a workaround.
CloudFront
- No Access Logs: Flying blind here. I don’t get detailed logs for requests, processing time, or responses.
- Workaround: None, unless I upgrade my plan.
- No Custom Policies (Origin Request, Cache, or Response): I can’t customize exactly what CloudFront passes to my S3 and API Gateway, nor can I tweak the cache keys. If you have a specialized workload that relies on specific headers or cookies for caching, tough luck. My biggest gripe about this: I can’t return hardened security headers or a strict Content Security Policy (CSP). The managed response headers are way too permissive.
- Workaround: The managed policies are good enough for standard WordPress, and I can inject my security headers and CSP using CloudFront Functions.
- No Origin Shield: In AWS’s own words, it ‘provides a centralized caching layer that sits in front of your origin to help increase CloudFront’s cache hit ratio and collapse simultaneous requests for the same object coming across multiple regions’. Without it, my backend is a bit more vulnerable. Say one of my uncached posts suddenly goes viral, requests from every edge location would hit my origins simultaneously. This traffic spike can overwhelm my origins, driving up CPU, memory, and database load (not applicable to me). It’s even worse for my API Gateway origin because its low TTL invalidates the cache frequently, forcing more direct traffic to it. In the worst-case scenario, my comments section doesn’t load (502/503 errors), and my API bill skyrockets from the repeated calls.
- Workaround: None. Without a plan upgrade, I just have to hope the edge cache holds.
- No Lambda@Edge: Think CloudFront Functions but with more features and language support. It’s not even available on the paid plans, but I think it’s in the works.
- Workaround: CloudFront Functions. It forces me to use Node.js even though I’m more at home with Python, but it gets the job done.
AWS WAF
- No URI Path Matching Rules: Even though a static WordPress site doesn’t have an admin portal (/wp-login.php or /wp-admin), I still want to block those paths so my origins don’t waste resources processing these requests. But I can only use URI path matching rules on the paid plans.
- Workaround: CloudFront Functions (again).
- No Advanced Managed Rules: I’d love to have these, but I’m not looking to pay through the nose for:
- Bot Control
- Anti-DDoS
- WordPress Application
- Workaround: My own custom rate-limiting WAF rule paired with CloudFront Functions (again).
14. Cost
Building a stack is one thing; paying for it is another. Here is the monthly breakdown of the big items in my AWS hosting bill for my serverless architecture:
| Item | Monthly Cost |
| CloudFront + AWS WAF | $0.00 |
| S3 | $0.00 |
| API Gateway | $0.00 |
| Lambda | $0.00 |
| DynamoDB | $0.00 |
| Bedrock Guardrails | $0.01 |
| Domain Name | $1.25 |
| Total | $1.26 (Before taxes) |
15. Final Thoughts
I totally crushed this design. Even before the migration, I knew my serverless stack would outperform what I achieved in Year One.
Now my self-hosted blog is faster, more secure, and more highly available than ever. You could even call it enterprise-grade.
The best part? I cut my hosting costs by nearly 10x.
Just like NYC has $1.50 pizza, I now have my very own $1.50/mo WordPress setup.
Honestly, I could only pull this off by staying up to date with the latest AWS developments. Trust me, this isn’t its final form—tech never sits still and neither should I. That’s the idea behind this blog: to out-engineer the status quo. It’s why I named it Mastering Web Hosting, not Mastered; there is no finish line for learning in this space.
As a tech bro, I love that.
As a business owner though… yeah, maybe not so much.
Here’s the tradeoff. The moment you self-host, you’re signing up to keep up. And performance really matters. Remember: a faster LCP → better SEO → more traffic → more revenue.
But you have a business to run, and hosting probably isn’t your top priority. Self-hosting isn’t free either; it costs time, skill, and sometimes a team.
That’s why hosting providers exist.
But which ones are actually worth your money?
I put them to the test against my own setup, partly for fun and partly out of vanity.
So far, only one provider holds up. I’m now an affiliate and I stand by it.
Check them out: WPX.
Leave a Reply