If you’re here, you’ve probably read how I built my current $1.50/mo enterprise-grade stack. But before I reached that level of serverless efficiency, I had to build it the hard way.
Even back then, my goal was the same: a WordPress blog that actually makes money. That meant I needed hosting, whether managed or otherwise. The problem was that every provider sounded exactly the same, and none of them quite hit the mark. With my AWS skills growing, I figured: Why not host it on my own server?
1. Self-hosting Year One
In this design, self-hosting meant getting my hands dirty. I was managing my own EC2 instance, configuring networking from scratch, and hardening my own firewalls. It was a lot of heavy lifting, but I wanted to see if my custom AWS setup could beat the pros.
This blog post documents that first major victory. It’s the architectural foundation that eventually led to the serverless, zero-cost design I use today.
2. My Design
Requirements
Even then, I was using the AWS Well-Architected Framework as my North Star. I decided my design had to be:
- Fast: A sub-1s Largest Contentful Paint (LCP). This is probably the most important for your business—faster LCP → better SEO → more traffic → more revenue. Google considers anything under 2.5s good, but I want better.
- Secure: Most people don’t know how to secure their websites. I have no excuse.
- Resilient: Highly available and fault tolerant enough to recover from downtime automatically.
- (Bonus) Cheaper than Managed Hosting: Since I was doing the heavy lifting myself (and loving the technical challenge), I expected the solution to be more cost-effective than a premium managed host. Otherwise, why self-host? However, I didn’t consider this a “must-have” initially because I knew that running 24/7 workloads on cloud servers can get expensive quickly. And it did. This realization eventually became my primary driver for pivoting to my current $0 serverless stack, which I’ll break down in a later section.
Docker
Hosting WordPress using only AWS resources would have been too expensive (~$70/mo according to AWS Budget).
To stay lean, I decided to containerize my WordPress blog. I swapped out four heavy AWS resources for lightweight, open-source images from DockerHub:
| Replaced AWS Resources | Open-source Docker Images |
|---|---|
| ALB + AWS WAF | Nginx + ModSecurity |
| RDS | MariaDB |
| ElastiCache | Redis |
Using Docker allowed me to run a much smaller footprint, meaning I could downsize my EC2 instances and slash my monthly bill.
Based.
The next question was: What’s the best way to run Docker containers on AWS?
Elastic Container Service (ECS)
I needed an orchestration tool that functioned like Kubernetes. Something that could monitor my containers and spin up new ones if one crashed, but without the massive overhead of K8s.
Enter my ECS (EC2 launch type) cluster.
Just like Kubernetes, ECS ensures my containers are always healthy. If one fails, ECS replaces it automatically, maintaining the high availability my blog requires. It’s also native to AWS, allowing for seamless integration with the rest of my stack:
- Auto Scaling Group: Ensures there is always one EC2 instance running my ECS cluster.
- Secrets Manager: Securely injects my WordPress salts and database credentials at runtime.
- Elastic File System (EFS): An encrypted, Multi-AZ file system for container persistence. If a container restarts, it reconnects to the EFS and picks up exactly where it left off.
- CloudWatch & ECR:For centralized logging and secure Docker image management.
Architecture Diagram
I know that’s a lot of infrastructure to digest, so here is the visual breakdown of how I hybridized cloud resources with open-source software:
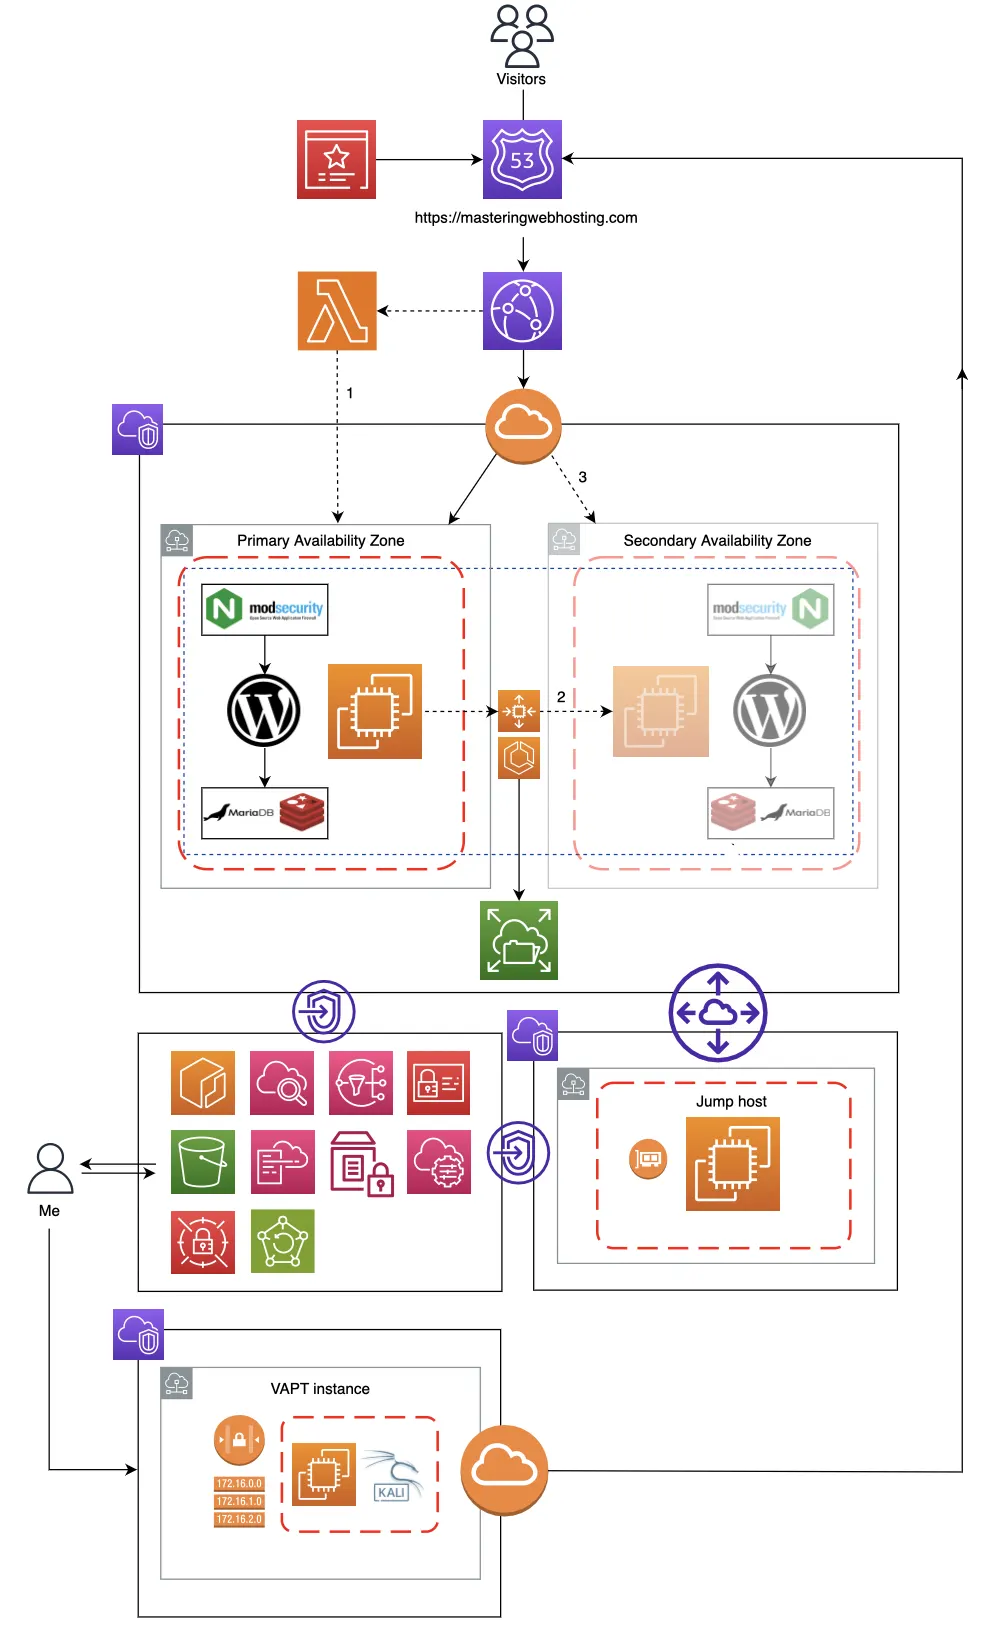
Next, I’ll deep-dive into the specific features of this design that allowed me to actually hit my requirements.
3. Speed Features
CloudFront CDN
To cache and serve my blog content to my readers around the world through its 750+ Points of Presence (PoPs).
With Route 53 as my DNS provider, I mapped my domain to the CloudFront distribution using A and CNAME records within a dedicated hosted zone.
If my content is cached in CloudFront, visitors receive it from their nearest PoP. Otherwise, their traffic is routed straight to my origin EC2.
Nginx
A popular open-source, multipurpose web server with high performance, scalability, and reliability.
For better speeds, I configured my Nginx with FastCGI Caching.
Using PHP-FPM (FastCGI Process Manager) to cache my dynamic WordPress pages directly on disk, drastically reducing the time it takes to generate and load a page for my readers.
Redis
An open-source system for in-memory object caching.
While Nginx handles page-level caching, Redis handles the data-level heavy lifting.
How it works:
Normally, my WordPress loads posts and comments by querying my MariaDB database every time a page is visited.
If the same content is requested repeatedly, these redundant queries can overload my database, slowing down retrieval and overall site speed.
By caching this frequently accessed data in memory with Redis, retrieving it is much faster than from my database. My MariaDB gets a break and my blog stays responsive, even during traffic spikes.
4. Security Features
CloudFront CDN
As the entry point to my blog, CloudFront is my first line of defense:
- DDoS Protection: Using AWS Shield (Standard) by default.
- Geographic Restrictions: I whitelisted only specific countries to drastically reduce my attack surface.
- Error Caching: Specifically 403 Forbidden errors, so my server doesn’t waste resources on brute-force attempts.
- Encryption in Transit: I provisioned a TLS/SSL certificate for my domain via AWS Certificate Manager (ACM) to enforce HTTPS globally. This encrypts the traffic between my blog and my readers.
Nginx + ModSecurity WAF
Any traffic that clears my edge defenses hits my Nginx reverse proxy. This is where the real hardening happens. I configured Nginx to:
- Enforce Security Headers: Especially my Content Security Policies (CSP). This critical header prevents XSS attacks by whitelisting only trusted sources for scripts and styles, ensuring browsers refuses to execute unauthorized code.
- Restrict Access: I whitelisted my personal IP for my WordPress admin portal and blocked public access during my pre-launch phase.
- Traffic Redirection: For other sensitive paths so my WordPress container doesn’t waste overhead processing malicious requests.
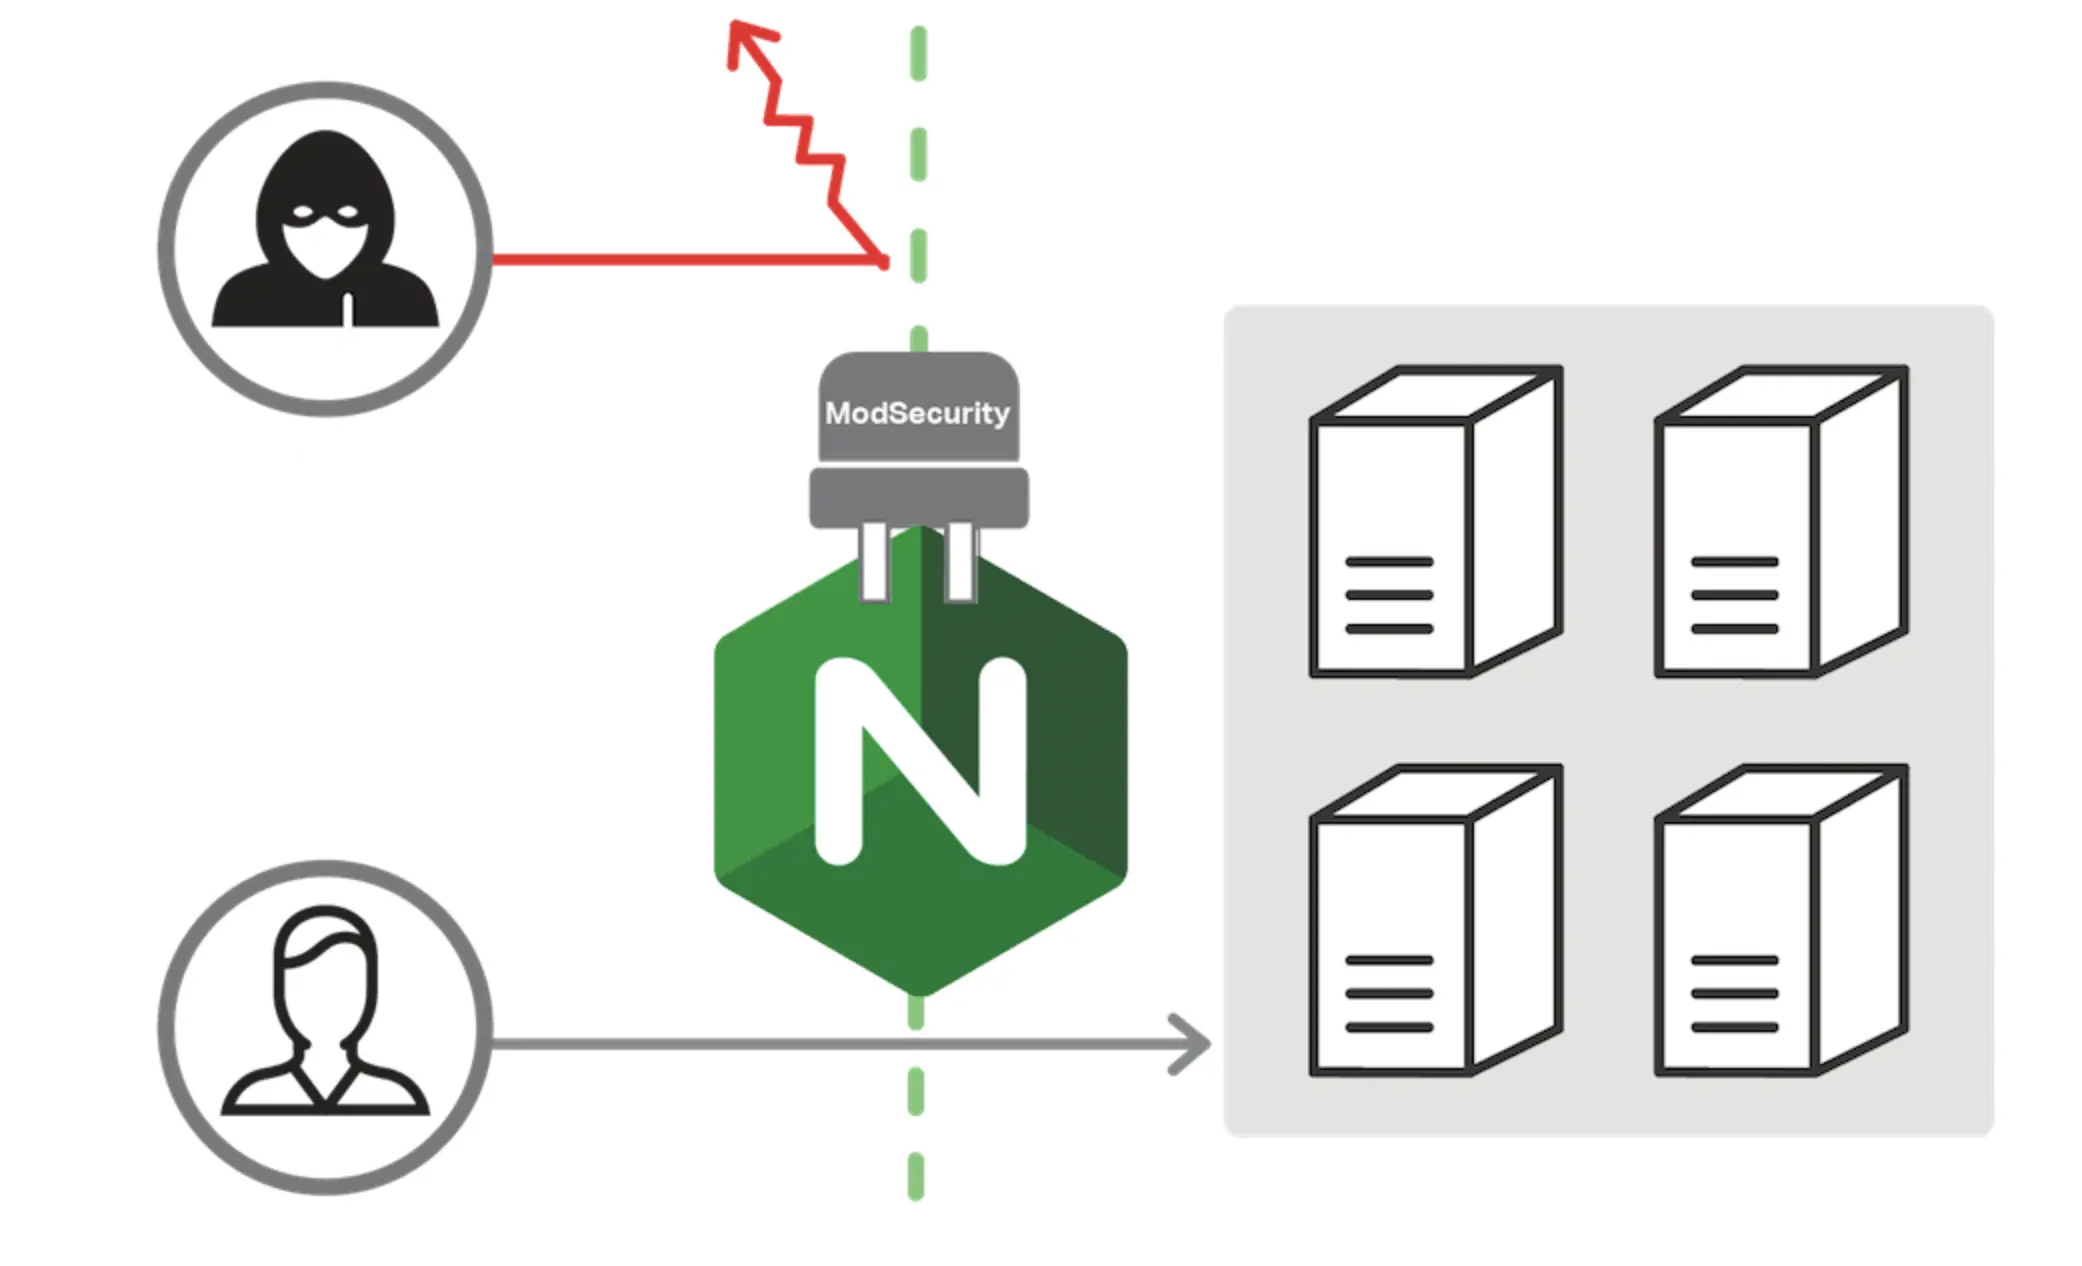
- ModSecurity WAF: I integrated the open-source ModSecurity (a Layer 7 firewall) to analyze traffic in real-time. By configuring the OWASP Core Rule Set, Project Honey Pot, and rate-limiting, I can block malicious requests with the OWASP Top 10 like SQL injections and cross-site scripting before they ever reach my WordPress. The defunct Lemp.io got a really cool diagram that shows how this works:
Network + Resource Isolation
My blog is hosted in a dedicated Virtual Private Cloud (VPC). While my EC2 instance is reachable via CloudFront, the rest of my resources are completely isolated.
- The Principle of Least Privilege (PoLP): Using Security Groups (Layer 4 firewalls) and IAM policies, I ensured no resource is overly permissive. My EFS and Secrets Manager are strictly locked down, accessible only by the specific resources that require them.
- Encryption at Rest: All sensitive data, from my WordPress salts in Secrets Manager to my files in EFS, is encrypted using AWS KMS.
Jump Host
To manage the stack, I provisioned a separate, isolated VPC containing a Jump Host. To maximize security:
- No Internet Gateway: The Jump Host cannot be reached from the public internet. Access is handled via VPC Endpoints and Peering.
- Strict Deployment IAM: Only this Jump Host has the permissions to build/push Docker images to my ECR or modify files in EFS.
- On-Demand Security: To reduce both the attack surface and costs, I only spin up this instance when I’m performing maintenance.
5. High Availability Features
Auto Scaling Group (ASG)
Like I said, my ASG ensures there is always one EC2 instance running my specific configurations. If my instance fails, the ASG provisions a replacement automatically.
- Active Monitoring: I configured SNS (Simple Notification Service) to email me the moment an instance is terminated. This keeps me informed of possible technical issues.
My Failover Strategy
In a perfect world, you’d run at least two sets of resources across multiple Availability Zones (AZs) or data centers. This provides 100% redundancy, but it also doubles your hosting costs. To get the best of both worlds, I implemented a failover plan:
- Primary AZ: My blog runs here and handles all production traffic.
- Secondary AZ: A standby zone ready to take over if the primary data center experiences an outage.
I created my own custom health check with Lambda@Edge to monitor my EC2. If CloudFront fails to retrieve my blog content three times, the failover sequence triggers:
- The Lambda marks my EC2 as unhealthy.
- The ASG spins up a new instance in the Secondary AZ. The new instance automatically mounts the EFS volume, allowing ECS to launch Docker containers with the most recent data.
- The new EC2 updates CloudFront to point to it as the new origin, and my blog resumes service exactly where it left off.
This plan gives me a Recovery Time Objective (RTO) of 4 minutes. While that means 4 minutes of potential downtime during a major AZ failure, it’s a calculated risk I accepted to keep costs lean.
Disaster Recovery
To ensure I never lose a single post, I implemented two final layers of protection:
- AWS Backup: My EFS data is automatically backed up, providing a point-in-time recovery option.
- CloudFormation (IaC): My entire infrastructure is defined as code, and I can recreate the entire stack in minutes.
- Parameter Store: I keep my environment variables in AWS Systems Manager Parameter Store, ensuring my variables are never hard-coded and stay protected if I ever share my templates on GitHub.
6. Resource Monitoring
I used CloudWatch integrated with SNS to monitor my EC2 metrics (CPU, Memory, and Network). If it detects a performance dip or an instance failure, I receive an automated email alert, allowing me to respond before my visitor experience is affected.
7. Speed Test
Largest Contentful Paint (LCP)
GTMetrix reported this design clocked in at 306ms in Dallas and 253ms in London.
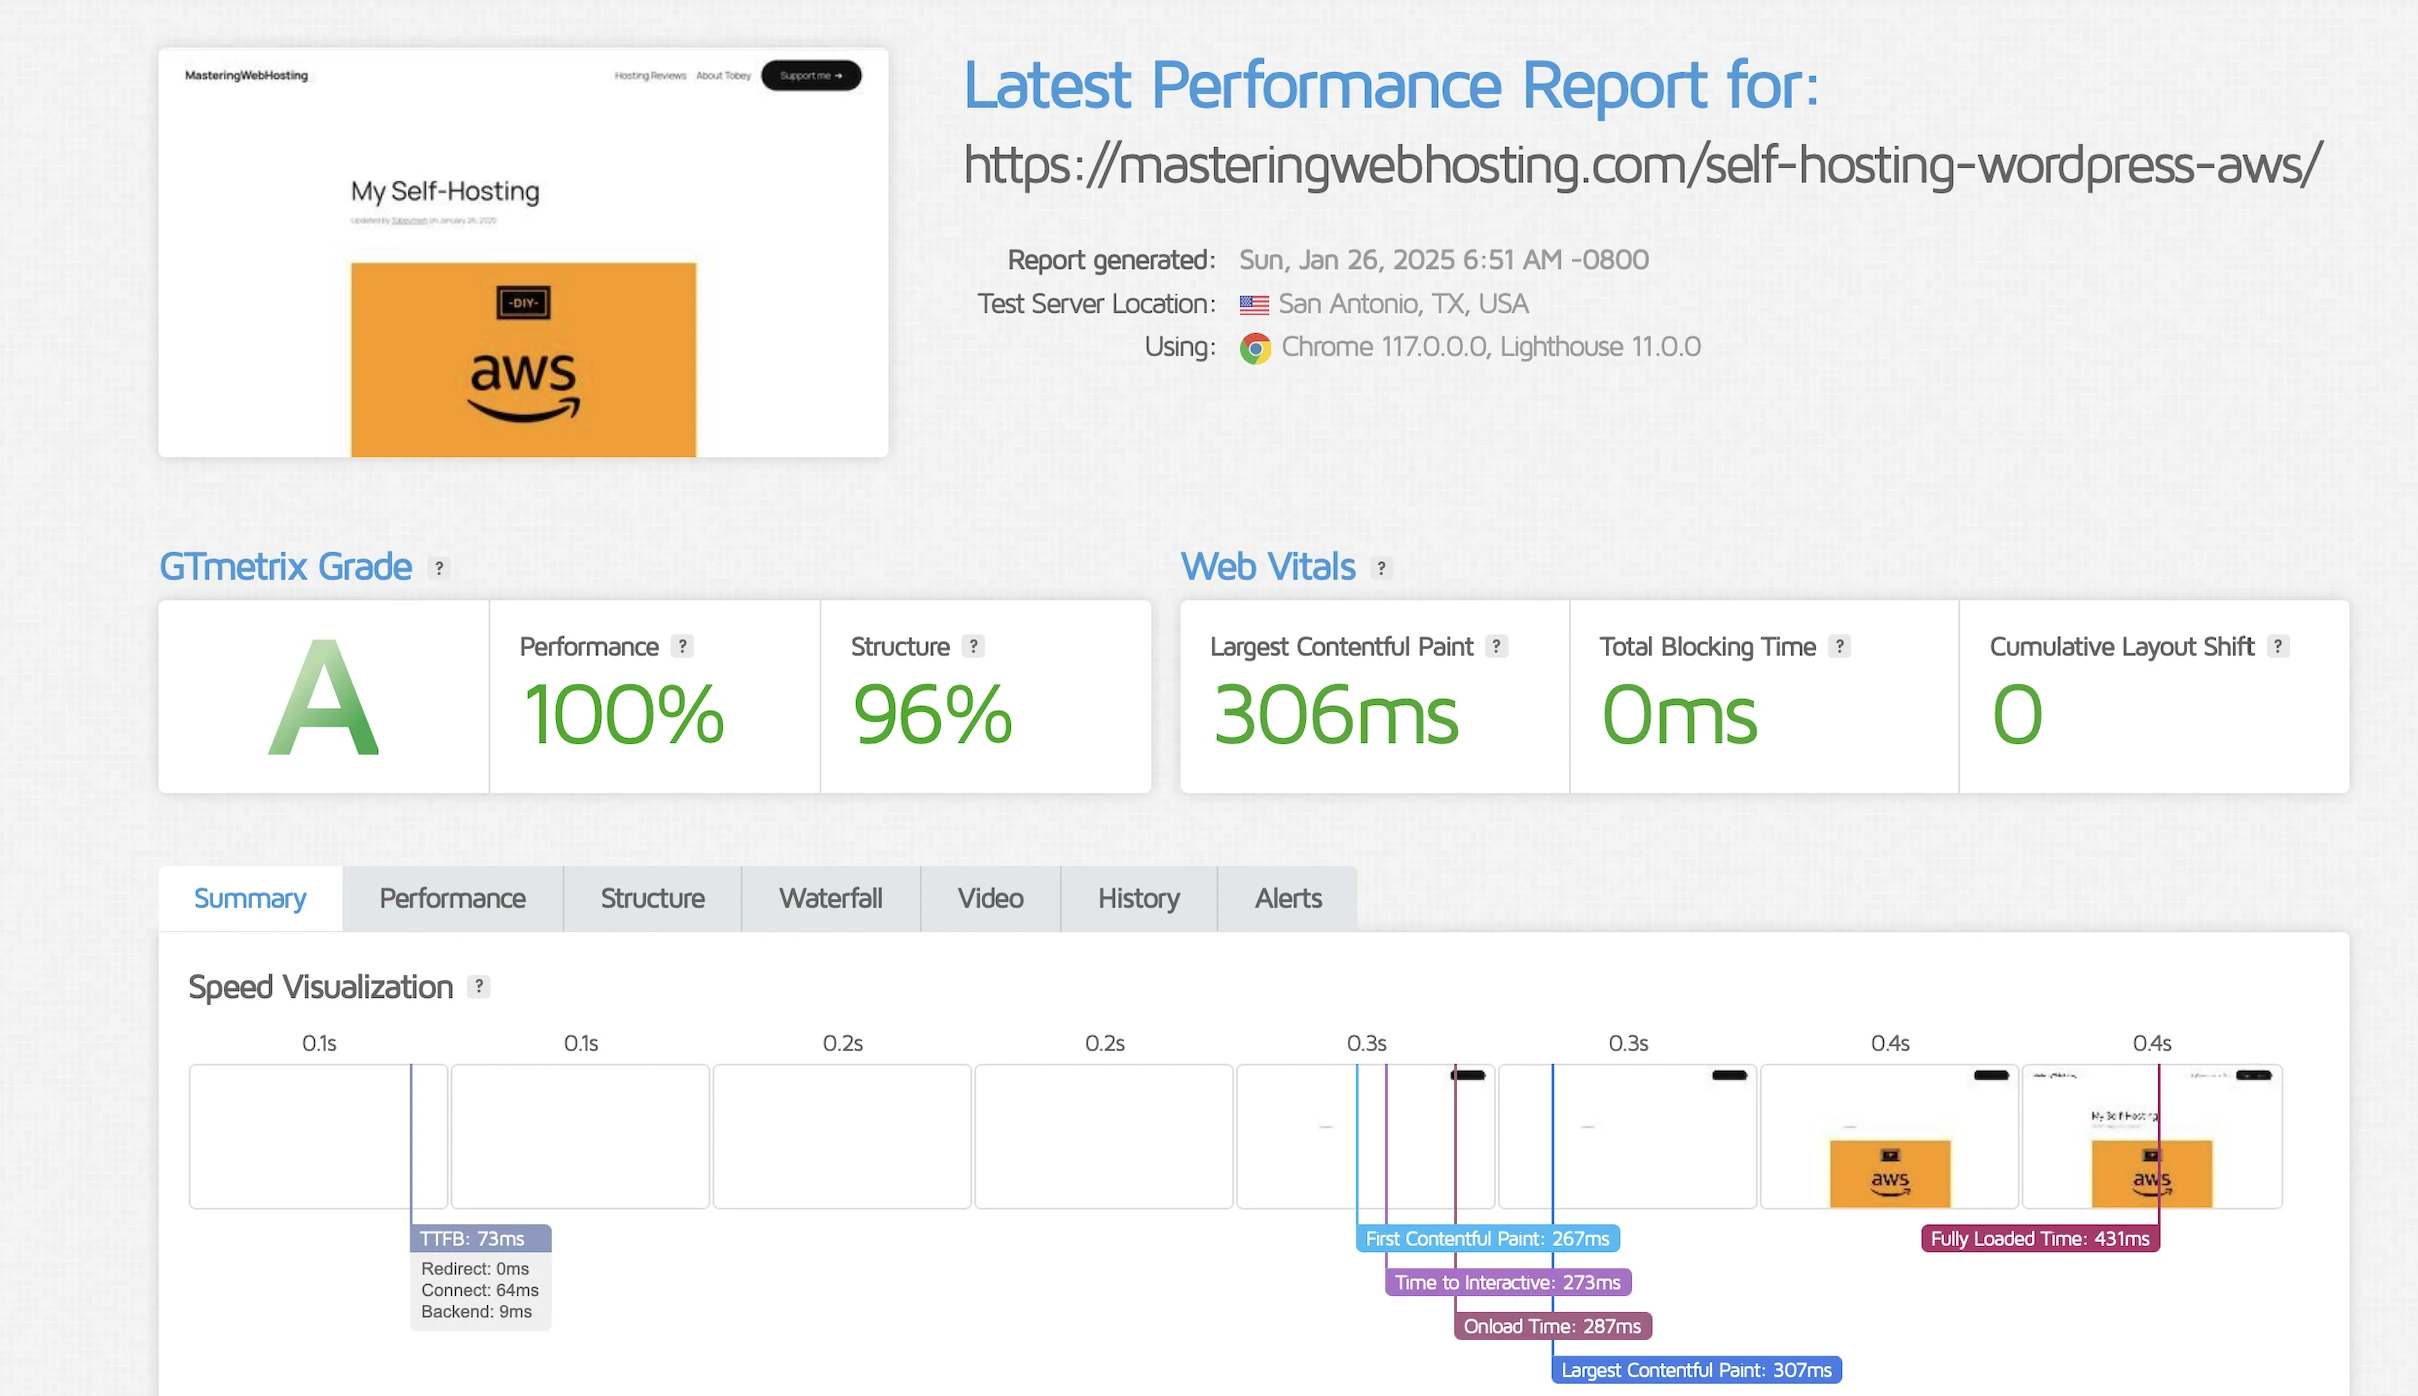

Holy cow, that’s more than 3x faster than my original requirement!
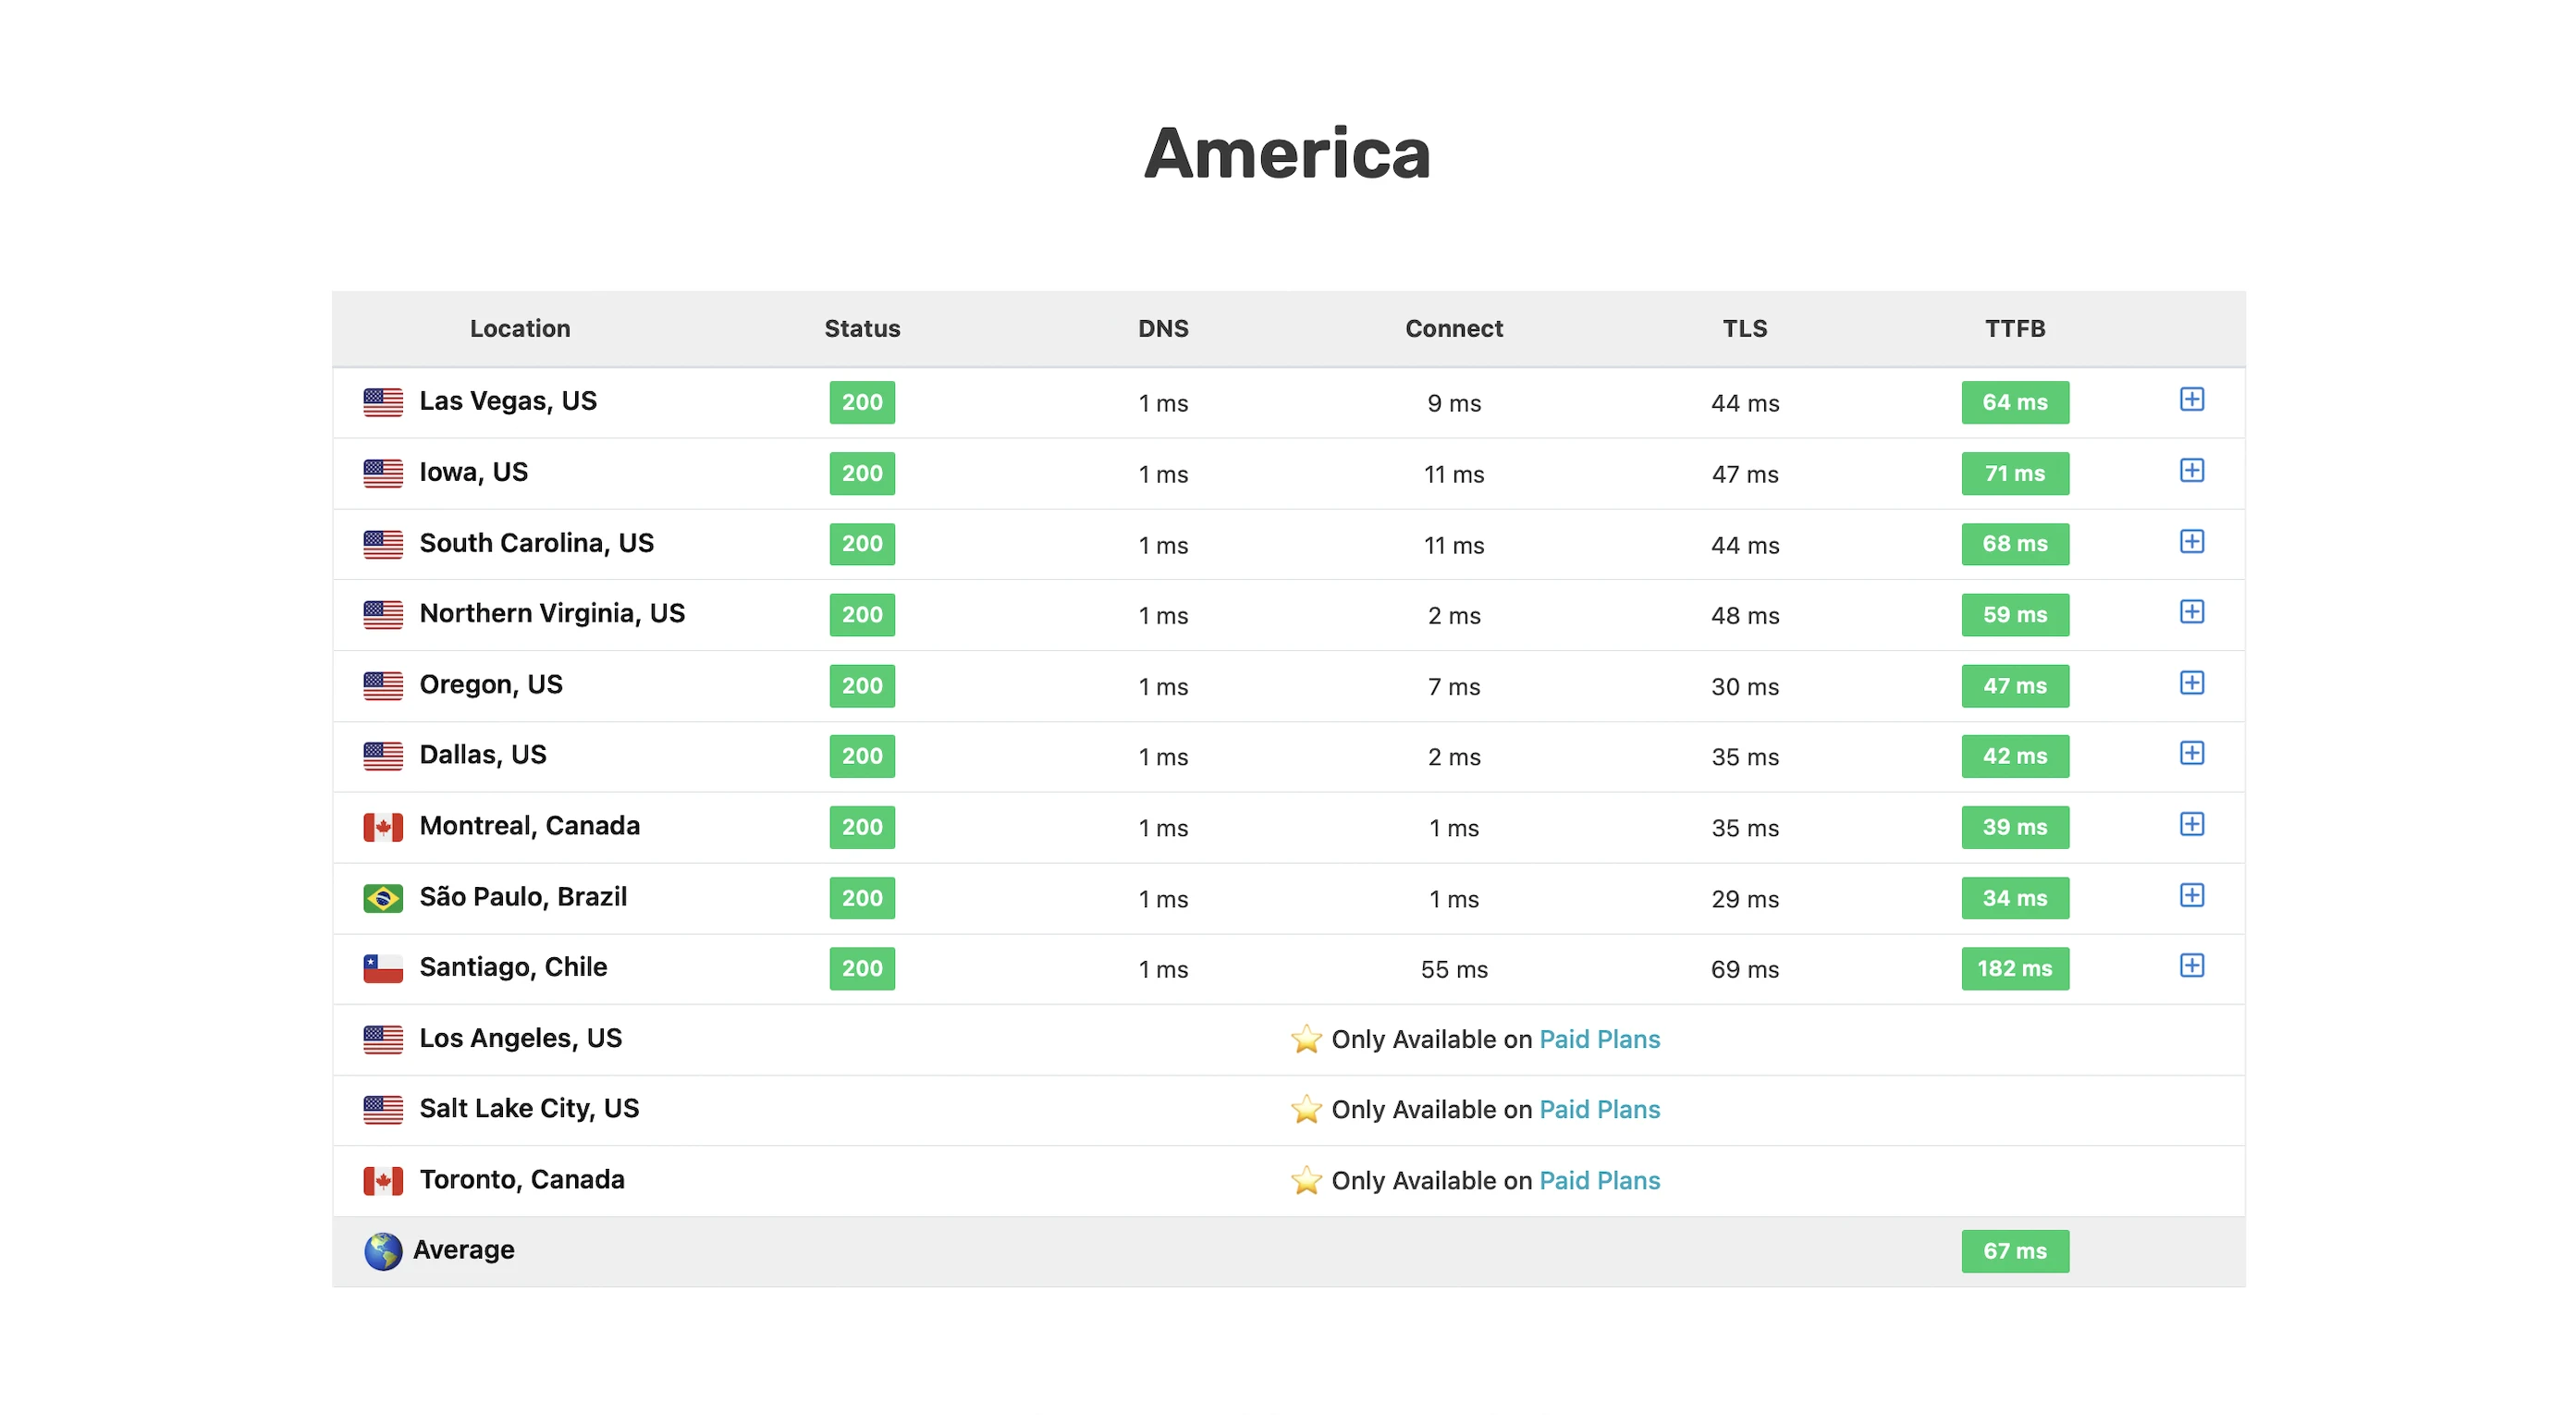
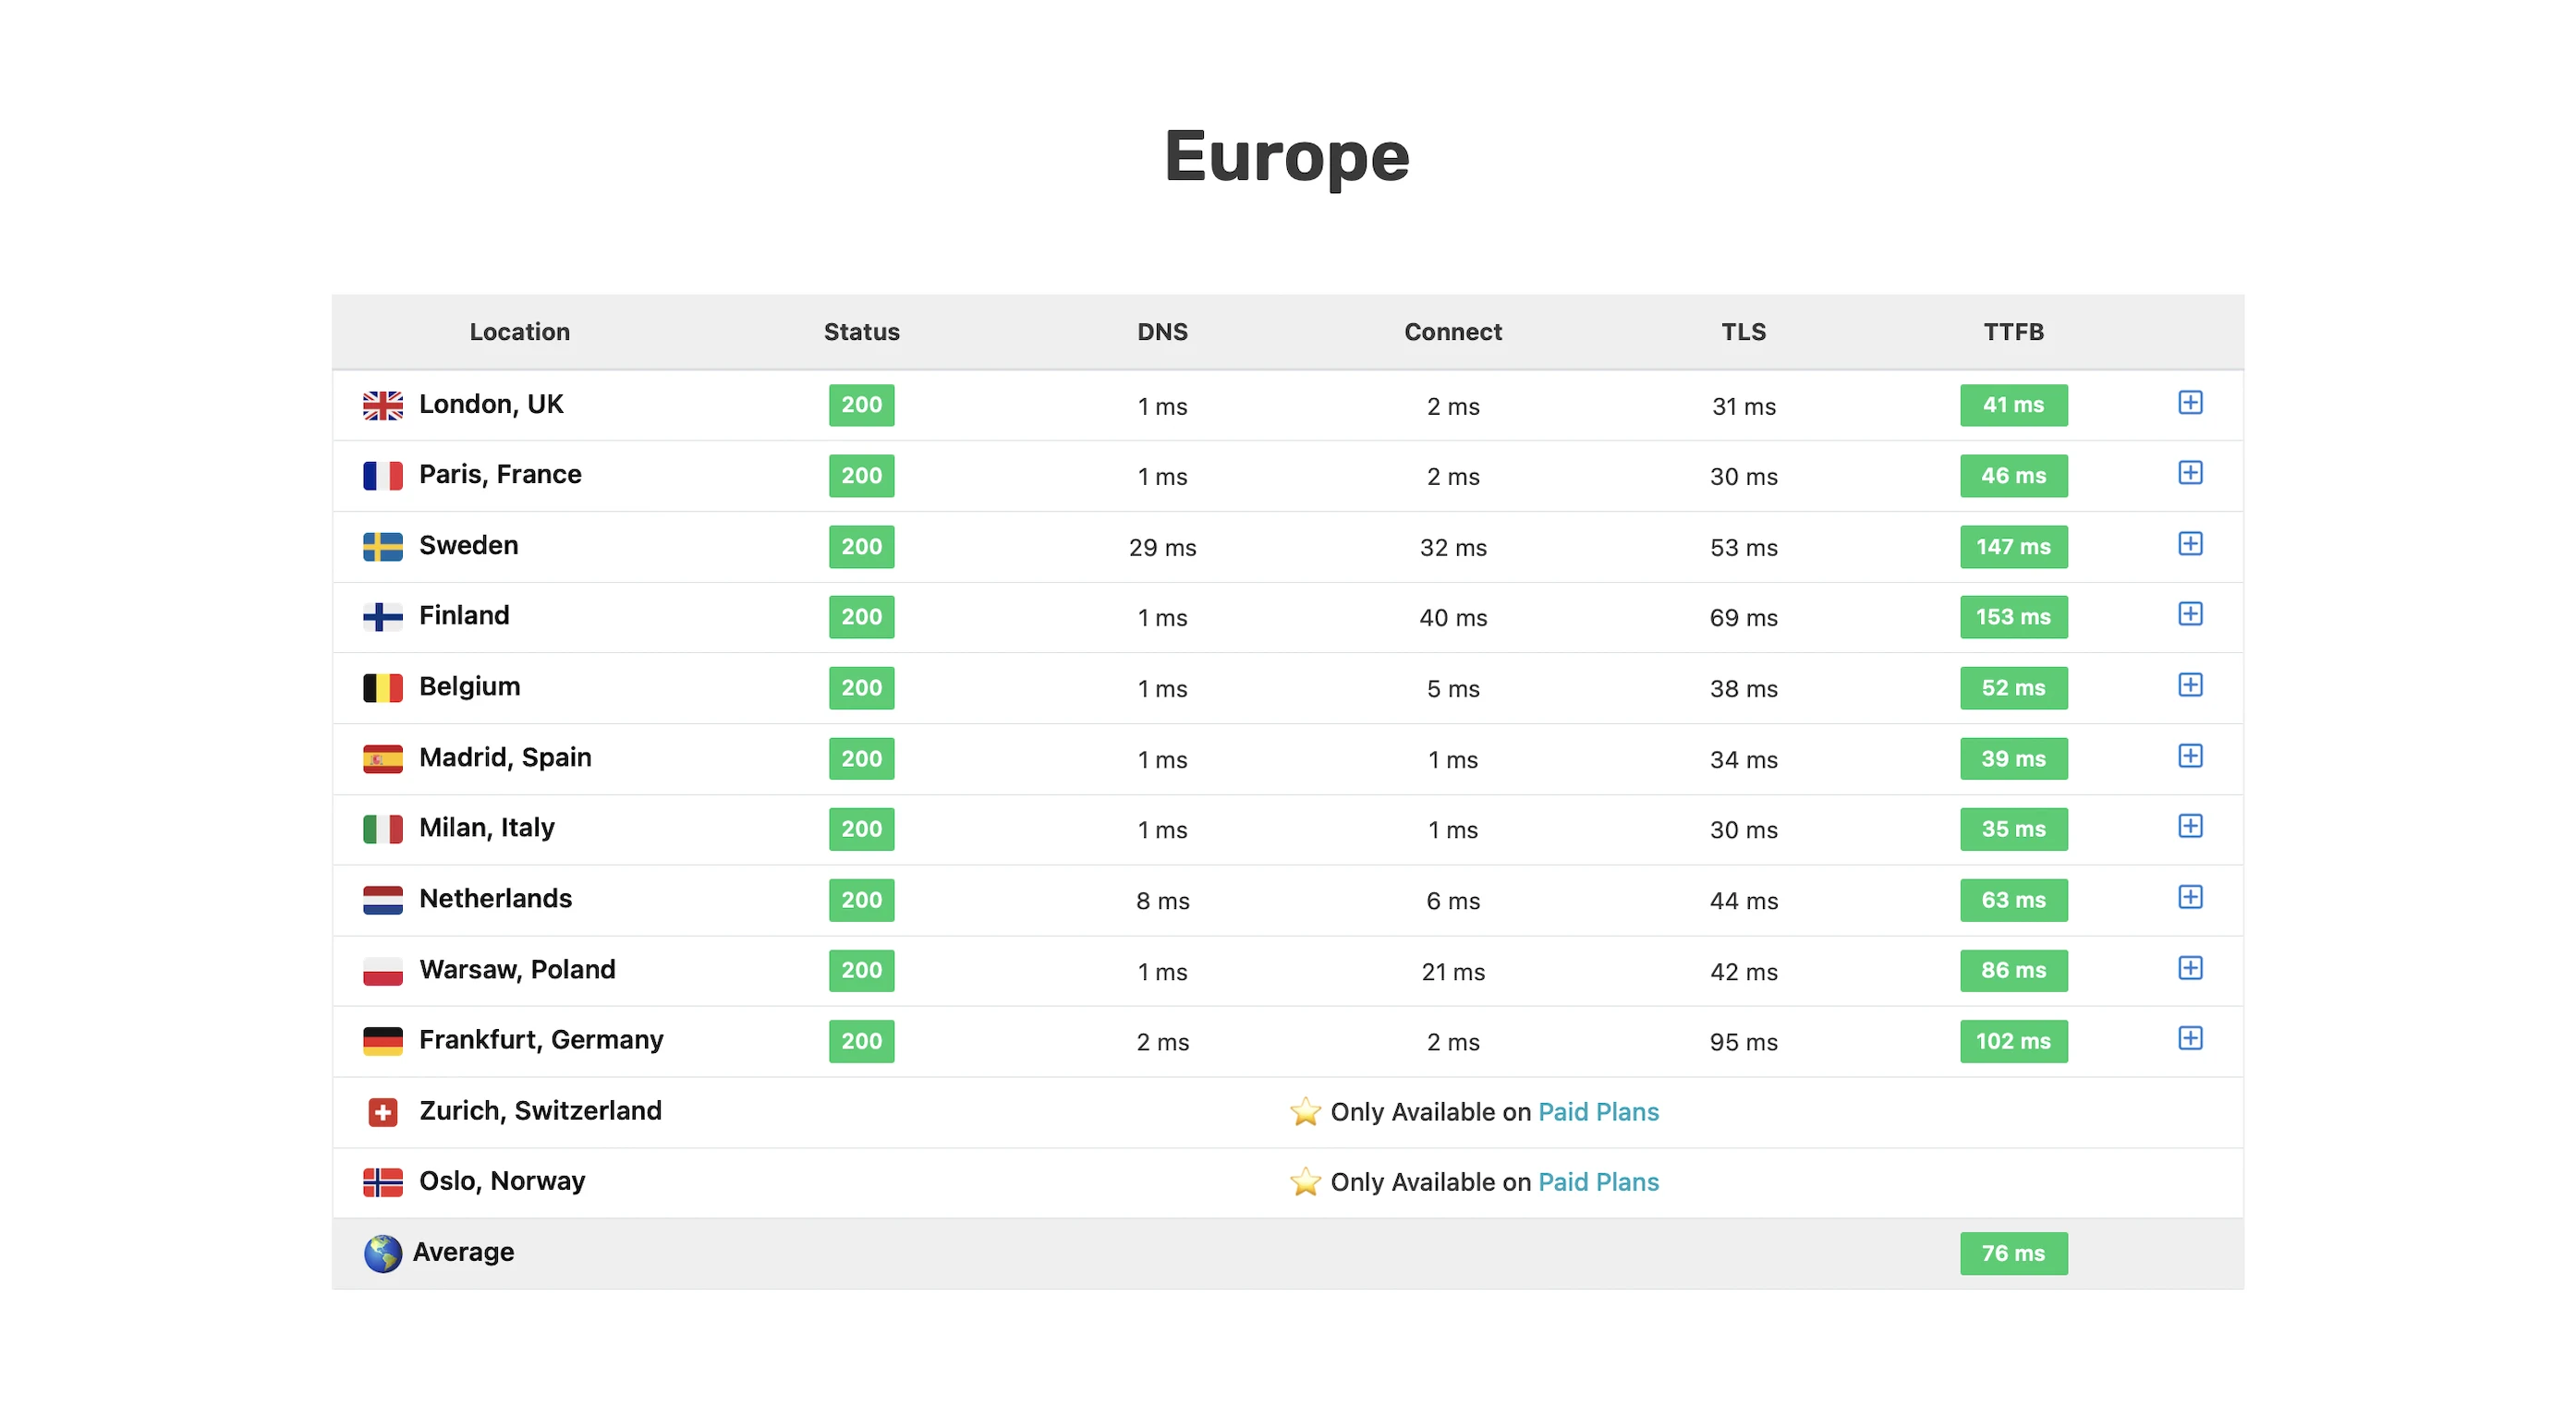
Time to First Byte (TTFB)
I wanted a real-world benchmark to see how my design stacked up against premium hosts who tout their proprietary CDNs or “lightning-fast” TTFB.
SpeedVitals gave my site an A grade, with a global TTFB average of 90ms.
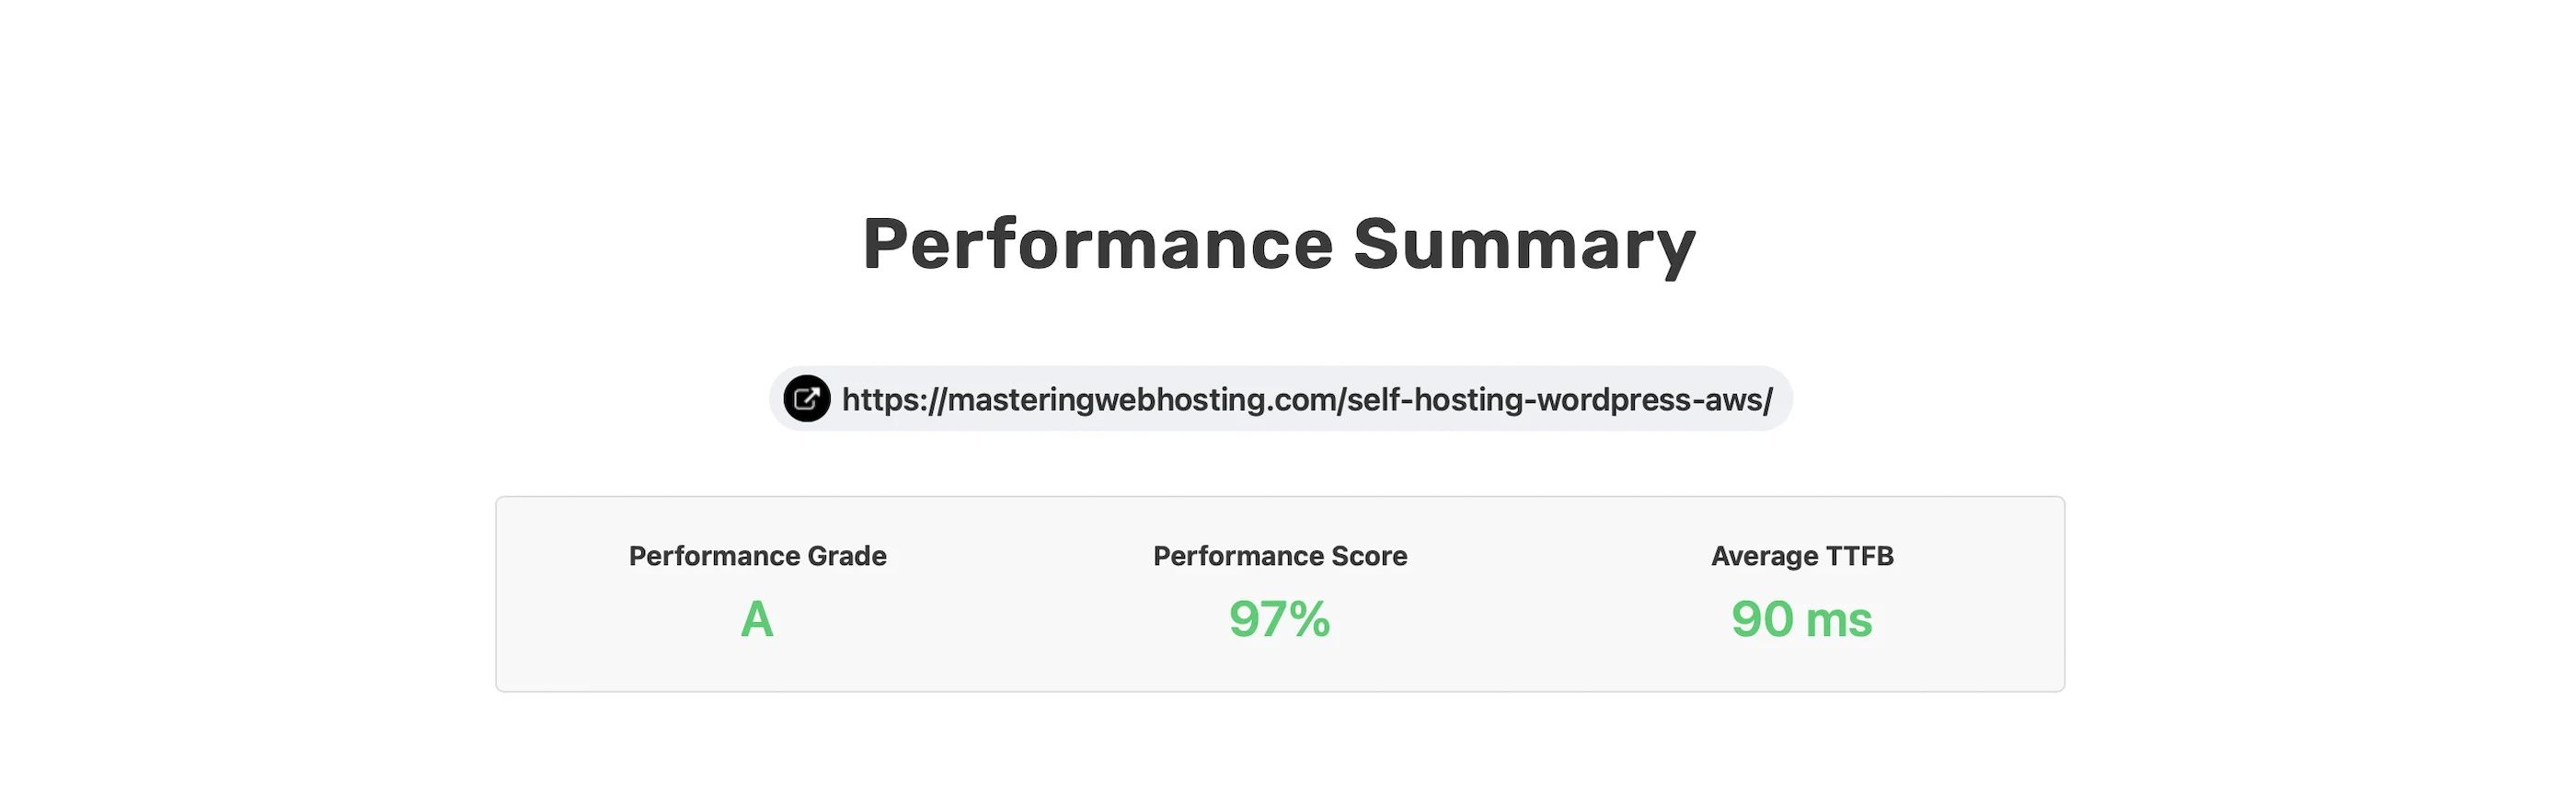

Overall, not bad at all for a self-hosting solution!
8. Security Test
After all that hardening, I wanted to test how secure my blog is. So, I provisioned a Kali Linux EC2 and ran a Vulnerability Assessment and Penetration Testing (VAPT) using Zed Attack Proxy.
I launched 15,508 cyber-attacks against my blog. The results:
- High Risk Vulnerabilities: 0 detected.
- Medium Risk Vulnerabilities: 0 detected.
- Informational Alerts: 1, but this isn’t a vulnerability.
- Success Rate: 95.6% of attacks were completely neutralized by the WAF.
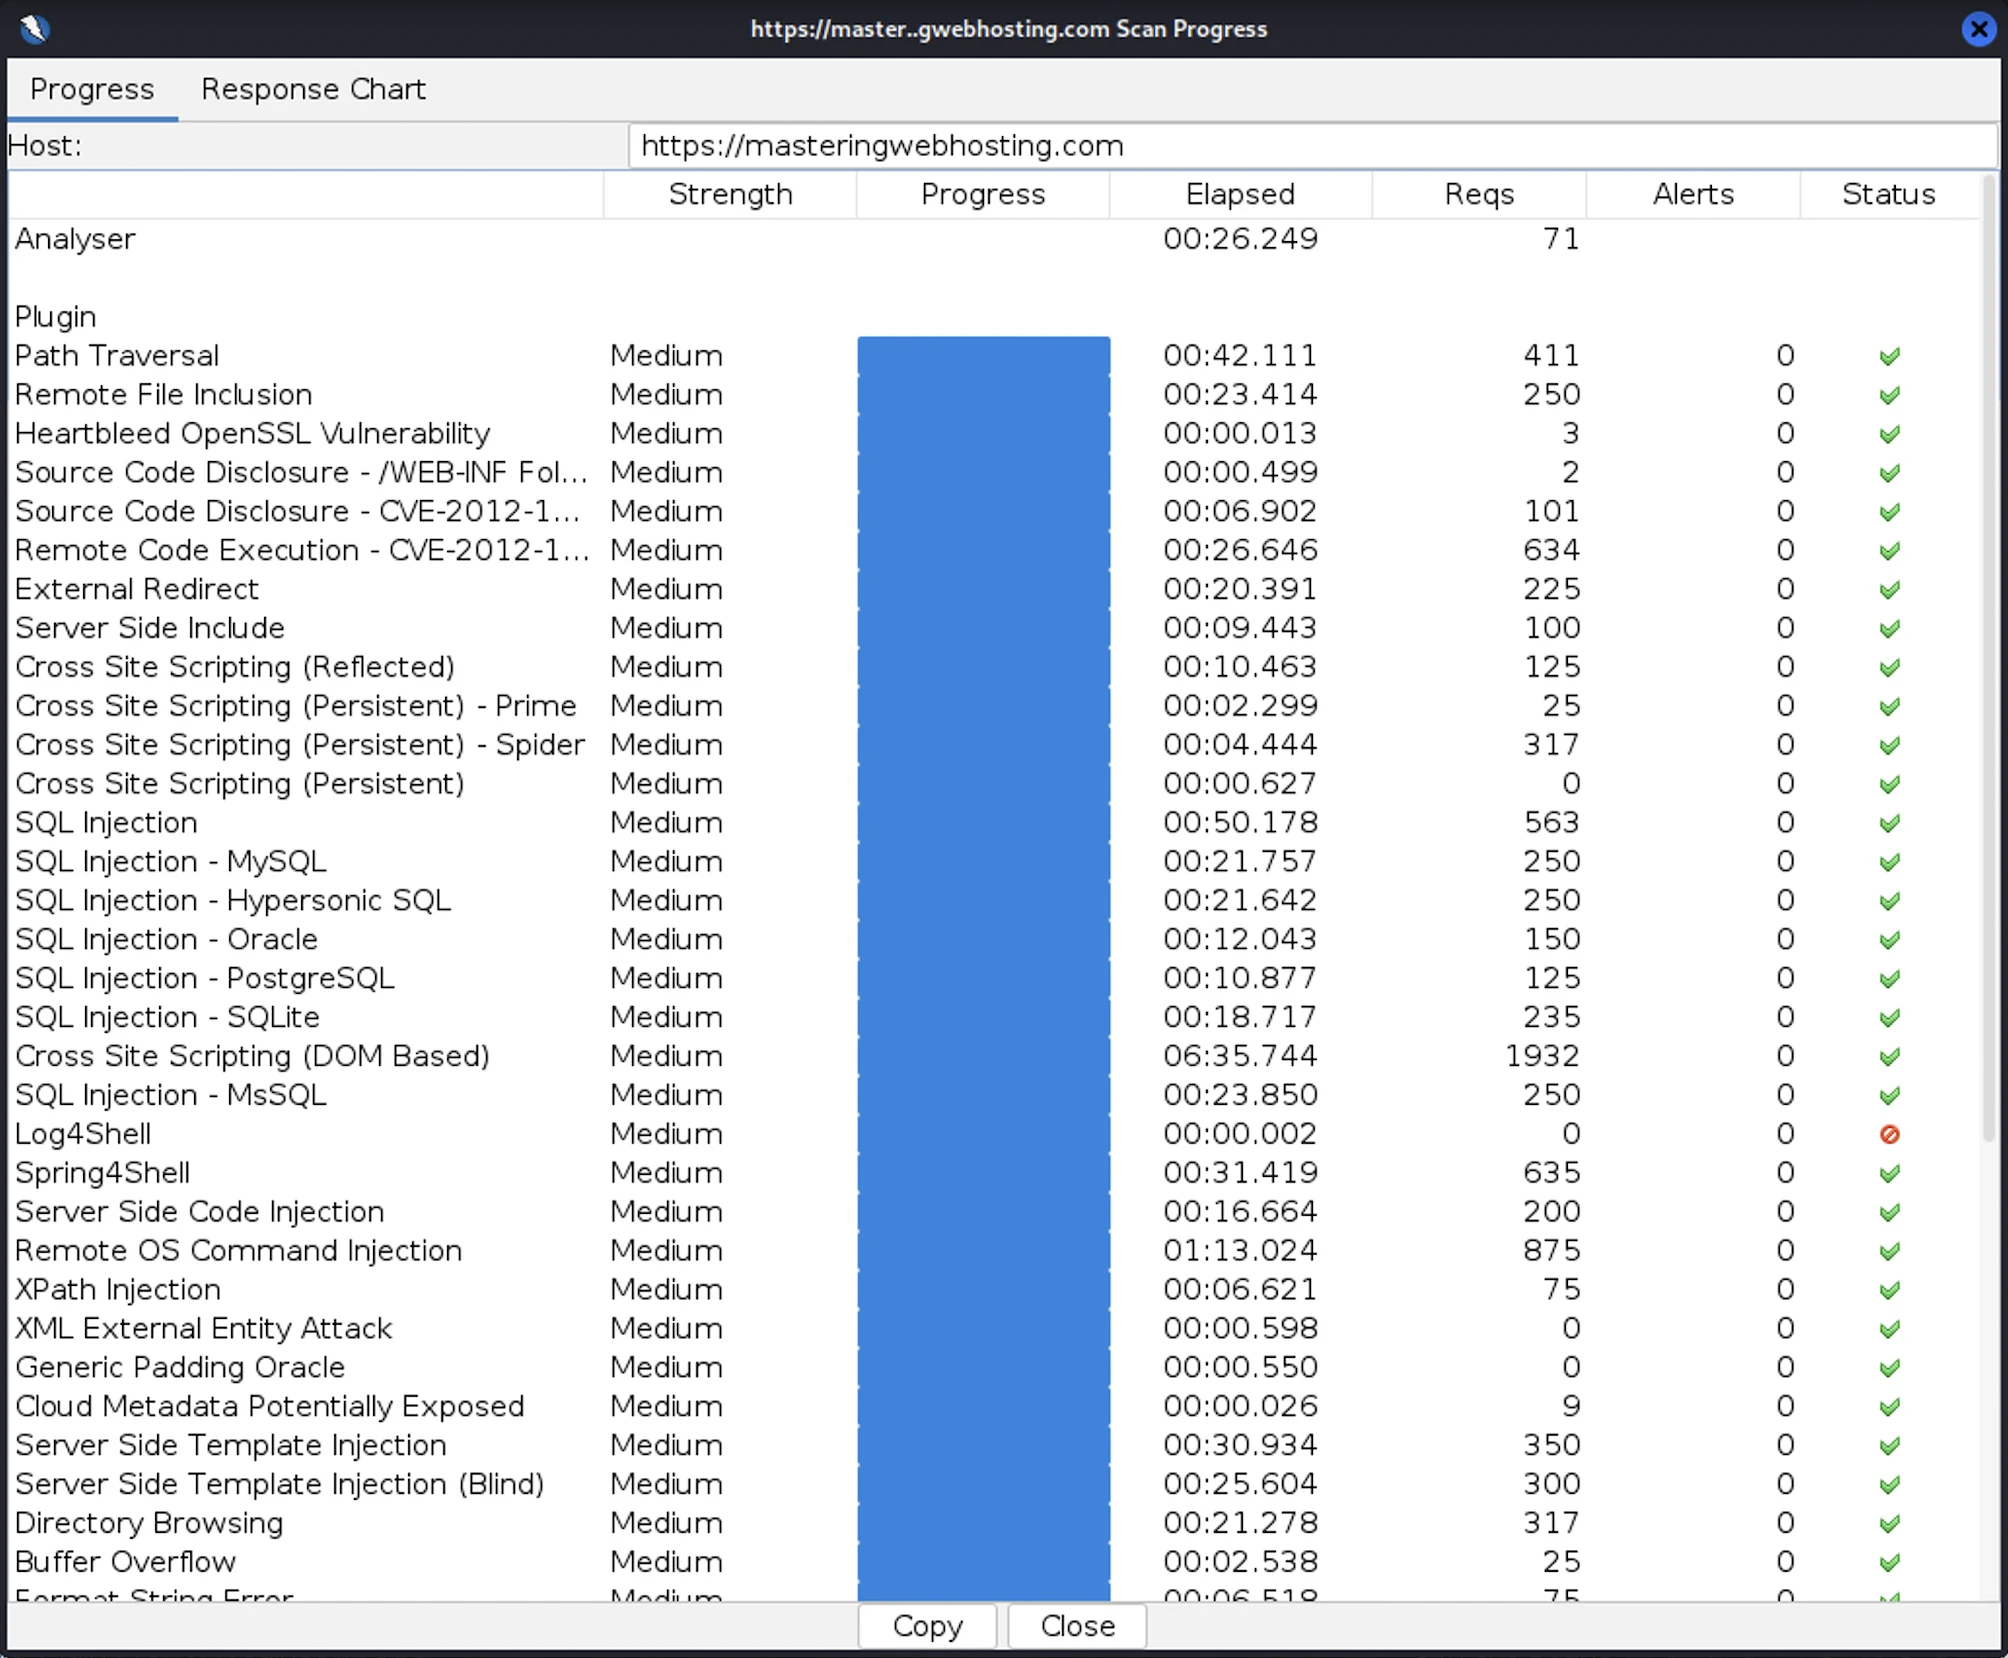

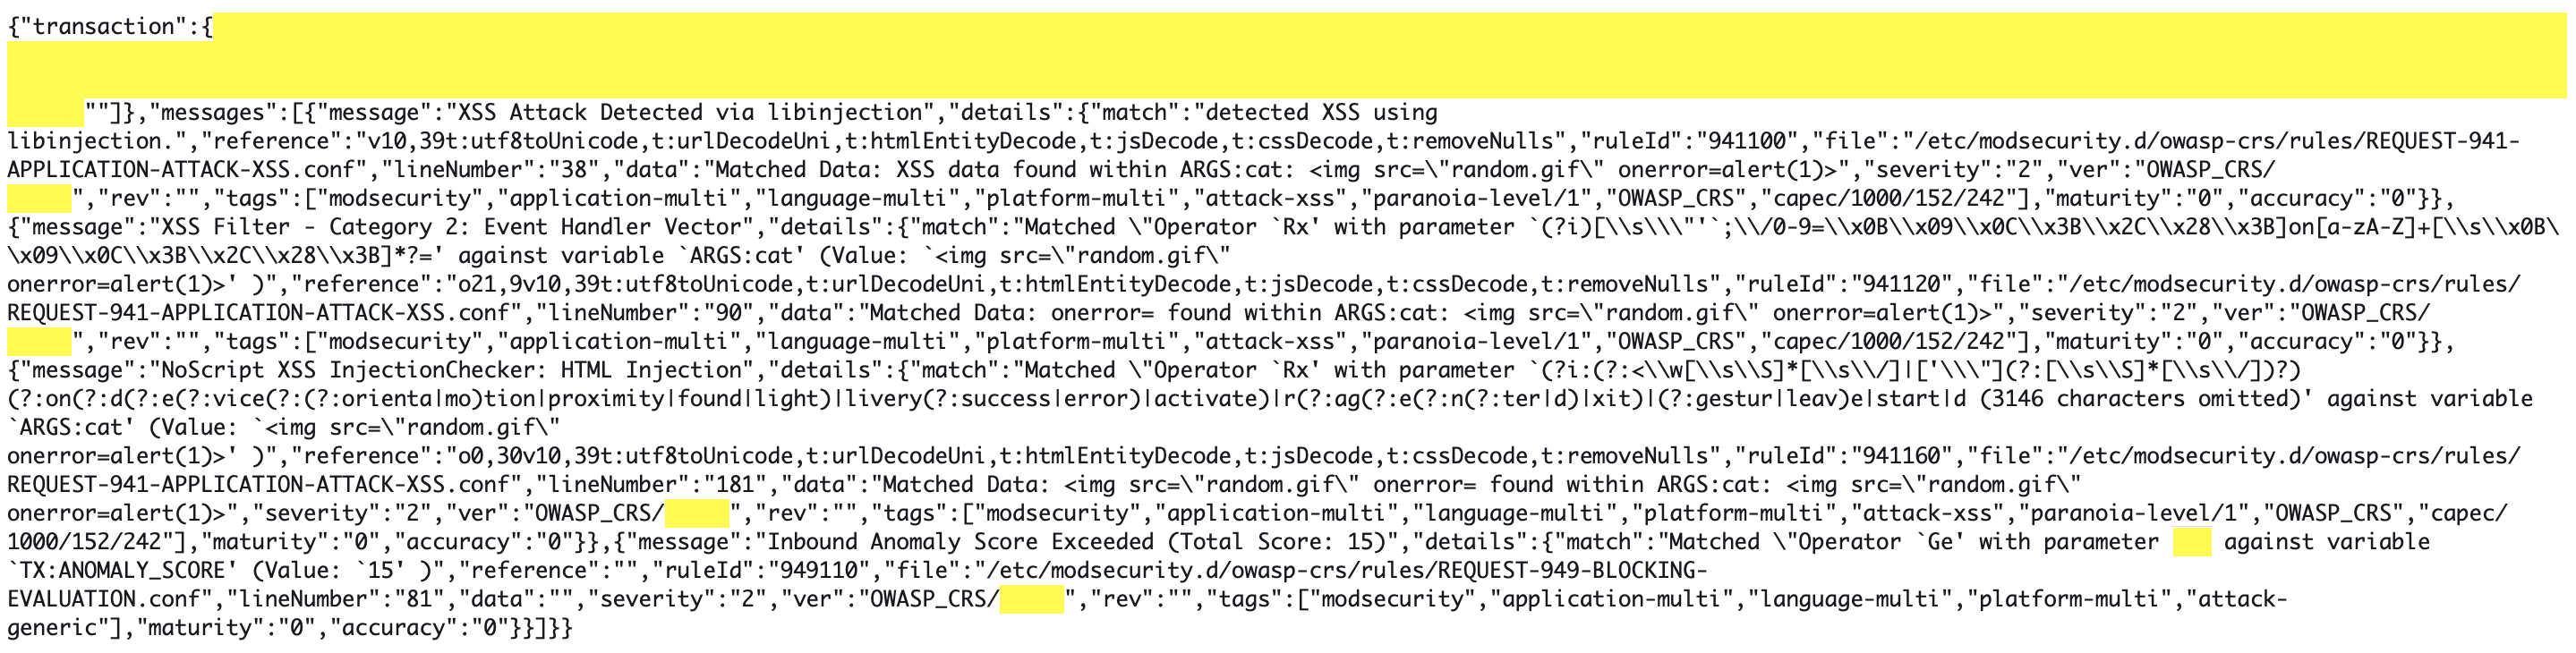
As final proof that it works, here’s what my ModSecurity WAF logs look like:
Fun Fact: I actually had to run my VAPT twice. My ModSecurity rate-limiting rules were so effective that they identified my Kali Linux instance as a DoS threat and blacklisted my IP within the first few minutes. I had to temporarily disable these rules just to finish the scan. It’s great to know that my DoS protection works exactly as intended.
9. Uptime Test
I ran this EC2-based design for a full week as a production stress test. While I hadn’t started using third-party monitoring tools like UptimeRobot then, I relied on my CloudWatch Alarms and SNS to notify me of downtime.
Zero alerts.
Throughout this production run, my stack maintained zero observed downtime. My SNS topic remained silent, confirming that the instance health checks never failed and that the system comfortably operated within the high-availability standards (99.5% uptime) expected of a professional AWS deployment.
More importantly, I verified the design before go-live. My automated failover tests confirmed a Recovery Time Objective (RTO) of under 4 minutes. I didn’t just trust the cloud; I engineered a way to ensure that if a failure did occur, my blog would revive itself before a user even had time to react.
10. Cost
Building a stack is one thing; paying for it is another. Here is the monthly breakdown of the big items in my AWS hosting bill for my EC2-based architecture:
| Item | Monthly Cost |
| 1 Reserved t3.micro EC2 (2GB RAM) | $4.32 |
| Public IPv4 Address | $3.65 |
| Domain Name | $1.25 |
| Route 53 (DNS) | $0.50 |
| Secrets Manager | $0.30 |
| CloudFront / S3 | $0.00 (Within Free Tier) |
| Total | $10.02 (Before taxes) |
Note: I used Free Tier eligible EC2s for my jump host and VAPT instance to keep overhead low.
11. Final Thoughts
Self-hosting Year One was a massive success. My WordPress blog exceeded every requirement I set for speed, security, and uptime. Best of all? I did it for $10/mo—cheaper than many managed hosts with better performance to boot.
So, why did I shut it down?
The Realization: Good is not Great
While $10/mo for a high-performance, secure AWS stack is objectively cheap, I had a realization after one week in production: I was over-provisioned. I was paying for idle time. Even if I had zero visitors, my EC2 and IP were costing me money every hour they were running. In the world of modern cloud architecture, paying for idle resources is a design flaw.
The IPv4 address charges were especially frustrating for a small blog like mine. Introduced in February 2024, they practically increased my hosting costs by more than 50%!
The 2026 Pivot
As Fedora said in Indiana Jones and the Last Crusade: “It doesn’t mean you have to like it.”
I wanted to out-engineer these new costs. I knew I could maintain, or even improve, my speed, security, and uptime while cutting my bill down to zero. I wanted a system that only incurs costs when someone is actually reading my blog.
The result was my $1.50/mo Serverless Stack. If you arrived here from that article, you have now seen the heavy lifting that happens under the hood of a traditional server. You can likely understand why my biggest architectural migration yet had to happen.
In many ways, this migration captures the spirit of this blog: There is always a better way. Out-engineer the status quo.
Leave a Reply